Are you looking for an honest review on PostX, the popular WordPress Gutenberg plugin for post grids? Then, you’re here at the right place.
WordPress is a fabulous platform for bloggers. It not only has all the blogging features, but also it offers useful plugins that make your blogging experience much better. Among them is the robust WordPress plugin – PostX.
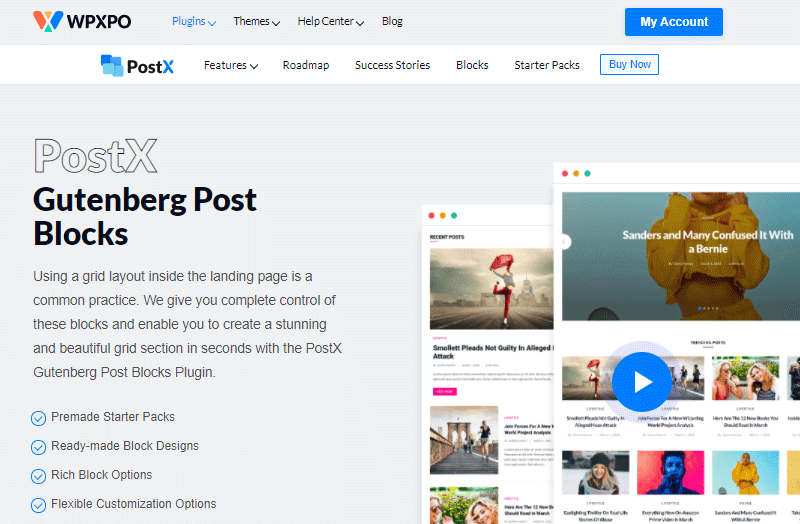
PostX is a WordPress plugin that makes your blog posts appear great on web pages. It offers a handful of Gutenberg add-ons for creating beautiful posts, lists, and sliders with tons of available templates. All in all, we found this a great plugin and a must-have tool for WordPress bloggers and content creators.
So, here’s our detailed PostX review.
Table of Contents
A. What is PostX? – Overview
PostX is one of the powerful Gutenberg block plugins for WordPress. It adds a handful of cool blocks on your WordPress native block editor ‘Gutenberg’ which makes your blog pages look beautiful and professional. With PostX, you can design your website with more intuition and no coding at all.

With 15+ additional Gutenberg blocks and their in-depth settings, you’re sure to give your blogs a unique look. Moreover, it has 100s of pre-made templates to design the layout of your blog post and pages. If you don’t like the templates, you can also create your own from scratch and save them to reuse in the future.
When you use PostX, it’s up to you how you want to design your blog page. Whether you want to arrange the posts in beautiful grids or a list, the choice is yours. If you’re not fond of using the simplistic plain layout, then how about you use post sliders? You can do it too!
In addition, you can also choose what blog post information you want to show on your blog page. You can choose to show or hide the metadata like author, published date, etc.
It doesn’t look great with the post excerpt. Then, simply hide it completely or reduce the displayed words.
Likewise, there are tons of other options like animation, pagination, color, shadow, typography, spacing, margin, and so on to make your blog look fascinating. Also, PostX works nicely with all Gutenberg compatible WordPress themes as well. Thus, every WordPress site should have this plugin if blogging is an important part of it. It has 30,000+ active users and a 5 out of 5-star rating.
B. New Gutenberg Blocks That Come With PostX
So, what blocks are offered by PostX that make it so powerful? Let’s see.
i. Post List
This block will display your blog posts beautifully in a list. You’ll have 4 different blocks for post listing only. Even more, each one offers different designs and importable layout options. So, imagine the different ways you can display your blog posts in lists.
You can list the blogs in a single row fitting multiple posts. Or, a single post can take the whole row with a big banner image and a heading. The items following it can be shown in a grid-like frame or lists. You can also choose whether to display their banner images, title, metadata, and excerpt.
You can also use it to pin certain posts and display them on sidebars. This is usually done for showcasing the most important posts to attract visitors to read.
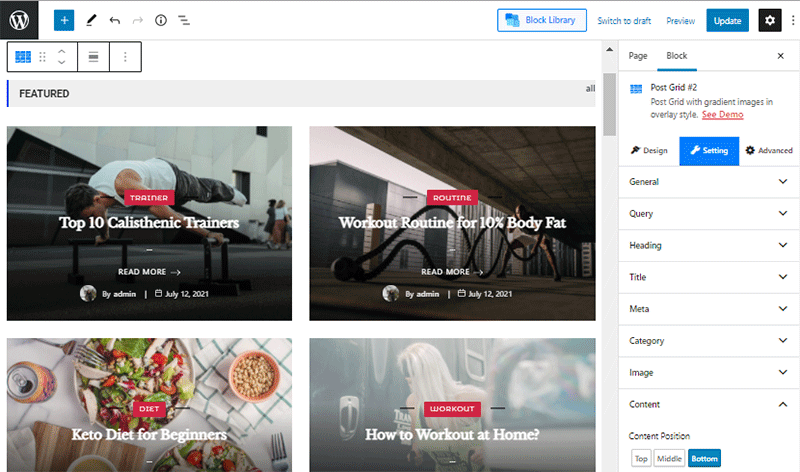
ii. Post Grid
The Post Grid block is pretty much similar to Post List, except it displays your posts in a rectangular grid format.
It also has 7 different grid blocks with varied layouts to choose from. Furthermore, each block offers at least 3 importable demo grid designs for your ease.
With Post Grid, your post title, a text excerpt, category, etc. are shown inside the grid images giving it a slick look. Its main focus is on contrasting your featured image. As a result, it gives them a more professional outlook enhancing your credibility.
iii. Post Slider
As the name sounds, the post slider block is for displaying your posts in a slider. It gives your visitors a glimpse of what your post is about. It’s also useful if you want to save up some space on your web page.
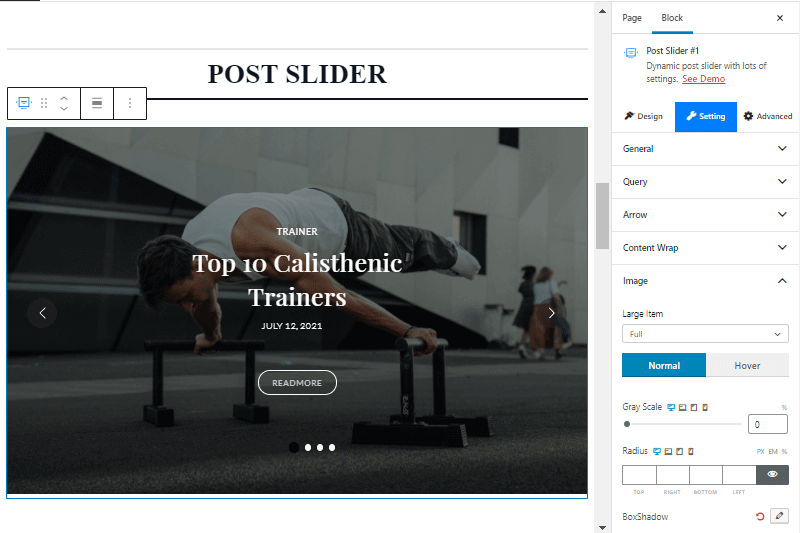
You can set a time limit for the slide to change automatically. Or, there are the next and previous arrow buttons on each side to change it manually with a click. There are different styles of arrows as well. In addition, you can choose how many blog posts to include in the slider.
iv. Heading
It’s simply the block that lets you add a customized heading on your web page. It adds more options than what the default heading block in Gutenberg offers.
It’s pretty straightforward to use it – just enter your heading title and use the available block setting to beautify it.
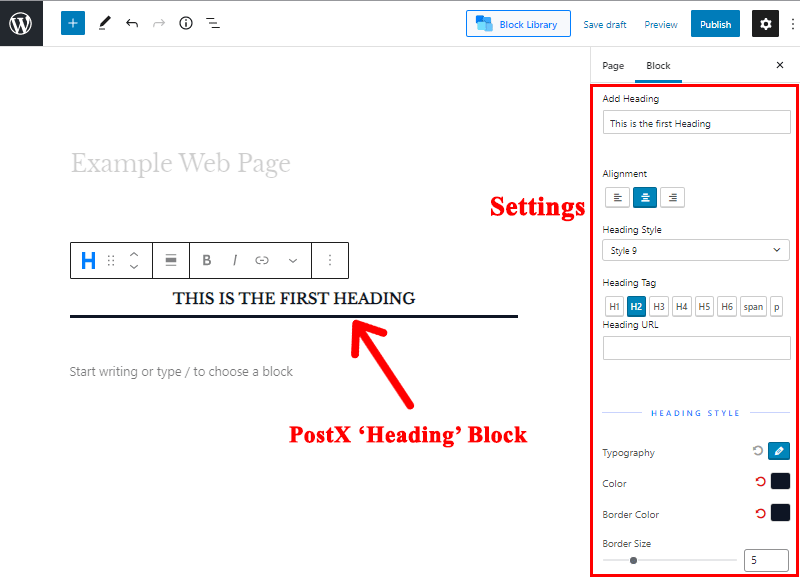
First off, you can arrange the alignment of your heading to left, right, or center. If you don’t like the heading style, then don’t worry. It has 20 amazing designs to choose from.
Obviously, you can choose any heading tag from H1 to H6, and link the URL to them if you want. Furthermore, you can adjust the typography, colors, spacing, and subheading of your heading block.
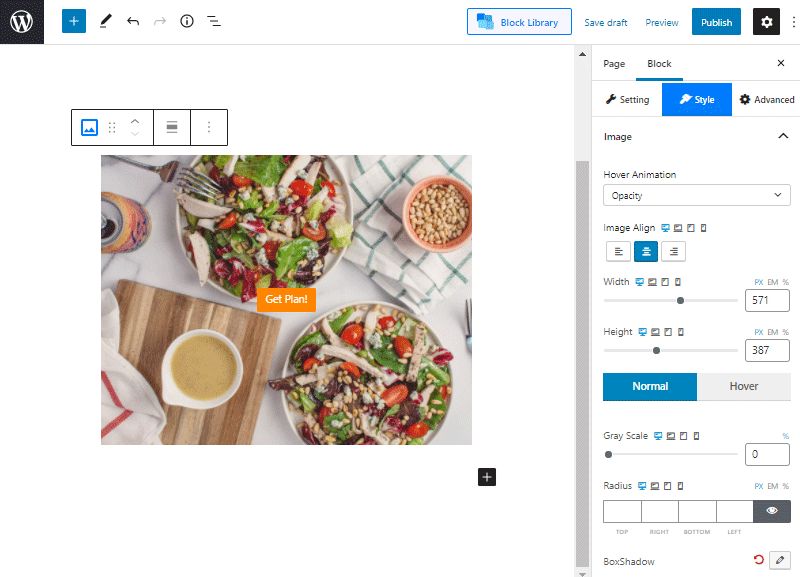
v. Image
The image block of PostX lets you add images to your web pages in a more elegant way. It offers different animation settings to make your image more interesting.
Similarly, settings like image alignment, height, width, gray effect, margin, etc. help you adjust the image.
Moreover, you can also add a call-to-action button or link to the image to make it engaging.
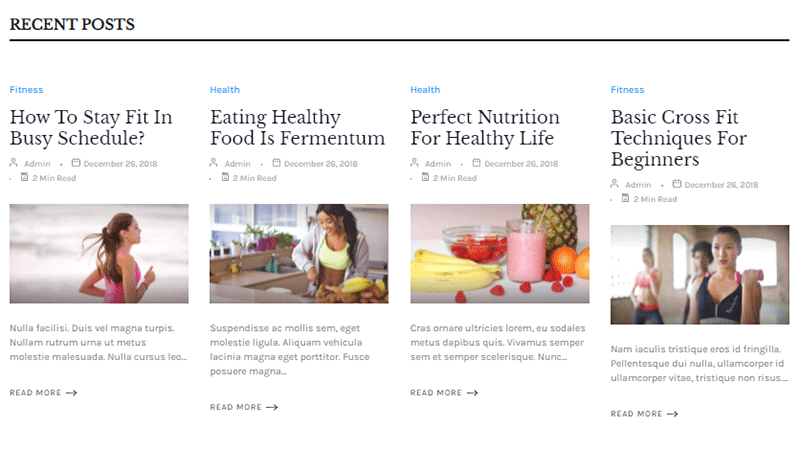
vi. Post Module
Post Module is another fantastic way of displaying your blog posts. The PostX plugin offers 2 different blocks for adding it to your web page. Moreover, both blocks have multiple layout designs and importable demos.
It specifically displays your posts in such a way that it takes 2 columns in 1 row on your screen. Within that, a single blog post takes 1 column, while the other one holds multiple posts.
It looks like the image below.
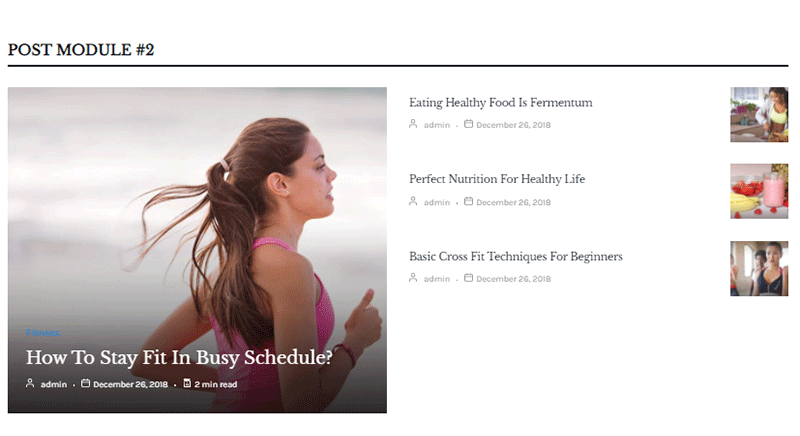
And of course, you’ll have options like showing/hiding titles, metadata, post excerpt, etc. You can also adjust all the elements on this post like in Post List and Post Grid.
vii. Taxonomy
Taxonomy is a block that lets you display your content according to categories and tags.
It has 8 different layout designs and an importable demo for each. You can use the available ones if you’re a pro user. Or, you can also create your own from scratch.
You can customize everything from the taxonomy title, colors, heading, images, content wrap, animation, colors, and more.
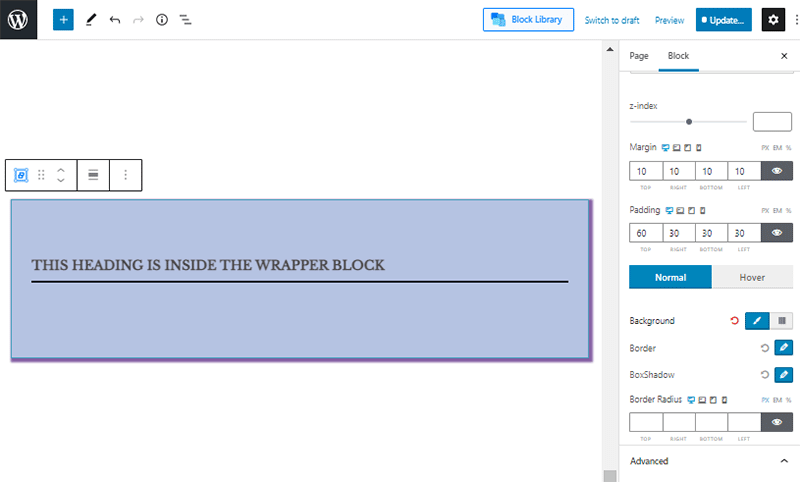
viii. Wrapper
The wrapper is a simple block that makes your content more engaging. It’s similar to the ‘Cover’ block available on the Gutenberg block editor at default.
If you want your page content to look distinguished, then you can use the wrapper block first. After adding it, you can add a new block inside it so that it would be separated from other content.
The wrapper block has many settings like background, color, hover color, border, margins, and so on. With that, you can customize it to your intuition.
C. PostX Features
Now, let’s see the features of PostX in detail.
i. Reusable Shortcodes
Some blog websites need to use the same post block over and over on different web pages. It can be really hard to create it every time you need it. With PostX, there’s no need to bear such trouble.
PostX lets you create a blog layout design once and save it. Then, it provides a shortcode of the design you created. All you need to do is copy and paste the shortcode as it is wherever you want to display it. It can be any of your posts or pages.
Moreover, the shortcodes comply well with popular page builder plugins like Elementor. Thus, you can use blog layout inside those page builders as well.
ii. Archive Builder
Archive builder is the most desirable feature of PostX that we liked. Normally in WordPress default, you’ll have a hard time nicely displaying the posts within a specific group. However, the PostX plugin makes it possible.
It lets you design a template for archive pages i.e. for your categories, tags, or authors. For that, you can use all the PostX blocks or even import from the premade starter templates and whole block design. So, don’t wait to make your archive page look professional and managed.
The archive builder is a new feature recently added on PostX and available on all paid plans. You might not find it right after installing it. You’ll need to activate it from the Add-ons option on the PostX menu.

iii. Importable Blocks Design
Till now, we’ve talked a lot about creating your blog page designs and blog layout using premade demos. Of course, PostX has made it easier for you to create designs with these importable block designs.
PostX offers you lots of importable designs for each of the blocks for designing your blog layout. To be specific, you can use the block design for the Post List, Post Grid, Post Slider, Post Module, and Taxonomy blocks.
You can simply choose the design you like. And your blogs would look the same. If you want to make some tweaks to the design, that’s possible too.
iv. Starter Library
Similarly, you can also make your whole blog page stand out with the designs available in the starter pack library. It consists of 15+ starter templates, both free and premium, that let you apply the whole page layout in just a click.
This feature is absolutely useful for beginners and time savers. You can just choose the design you like and it’ll apply to your page just like that. And obviously, you can tweak the layout if you want to personalize it further.
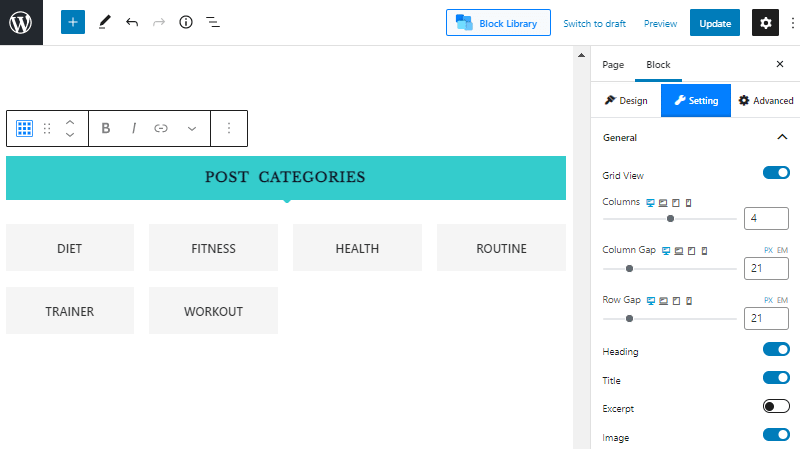
v. Extensive Block Settings
As we already told you, PostX lets you edit all the blocks with its powerful block settings. The available settings are according to what block you’re using. However, you can customize pretty much every aspect of the blocks with the settings you’re provided.
Here’re some of the settings:
- General: It has options like the number of rows, columns, and their gaps. Also, it lets you show or hide other elements like heading, title, excerpt, image, metadata, filter, etc.
- Query: It lets you showcase content based on certain criteria like most views, comments, popularity, random, updated date, etc. Moreover, you can choose to display from a certain taxonomy or post type.
- Heading: You can name your heading and manage settings like alignment, heading tag, URL, typography, color, etc. You can also select the heading design from the available 20.
- Title: Similarly, you can control the heading tag, color, hover color, typography, etc, of your post title.
- Category: It has options to manage your category design in your blog layout. Settings like category style, position, typography, position, etc. are available.
- Excerpt: It lets you manage your post excerpt on display. You can limit the number of words displayed with color, typography, and other related settings.
Similarly, you have more options to manage images, content, post-filter, read more buttons, etc.
vii. Add-ons
Add-ons are the small packets that add more features to your PostX Gutenberg post block plugin. You’ll have 2 addons – Elementor Addons, and Saved Templates available on the free version of PostX.
To enhance the power of PostX, you can utilize 7 more addons available in the premium version. So, you have 9 PostX addons to use according to your need.
Here are the available PostX addons.
- Category: It lets you use color and image for your taxonomies like category, tags, etc.
- Builder: It offers to create archive page templates for categories, tags, authors, etc.
- Elementor Addons: You can use Gutenberg blocks inside Elementor if you activate this addon.
- Saved Templates: It lets you create layouts and generate their shortcode. So, you can place the template anywhere with the help of the shortcode.
Moreover, you’ll have separate addons that let you display meta descriptions of various SEO plugins in your post excerpt. To be specific, you can import your post meta description from Yoast SEO, Rank Math, All in One SEO, SEOPress, and Squirrly SEO.
D. Getting Started with PostX – A Brief Walk-Through
Now that you are familiar with all the features and know-how of PostX, let’s see how to get started. Here we’ll cover everything from installing PostX, activating the premium version, to creating an eye-catching blog page.
Let’s begin.
i. Installing PostX
PostX is a freemium plugin – it has both free and premium versions. Even if you want to install the premium one, you should have the basic free version installed first.
Anyway, installing free PostX is possible from the WordPress dashboard directly. You can have a look at how to install a WordPress plugin if you want to know more.
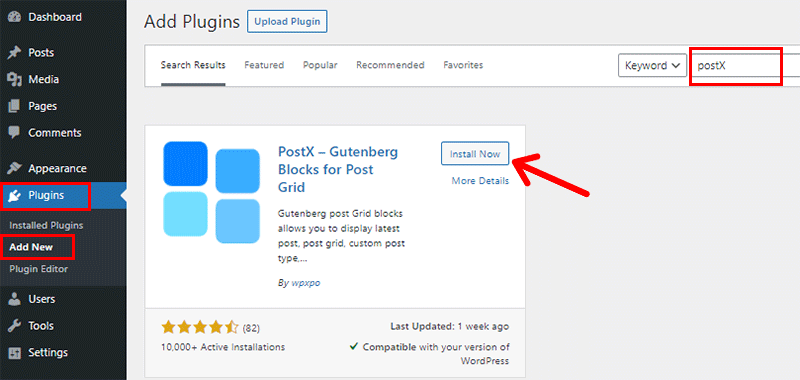
To start it, log in to your WordPress dashboard in your web browser first. Then, go to
Plugins > Add New
After that, search for a plugin with its name – ‘PostX’. Then, install and activate it right away.
You can do a lot with the free version too. However, the premium version gives you the total flexibility that you wouldn’t want to miss.
ii. Purchasing PostX Pro
To purchase PostX premium, go to WPXPO’s official website in a new tab.
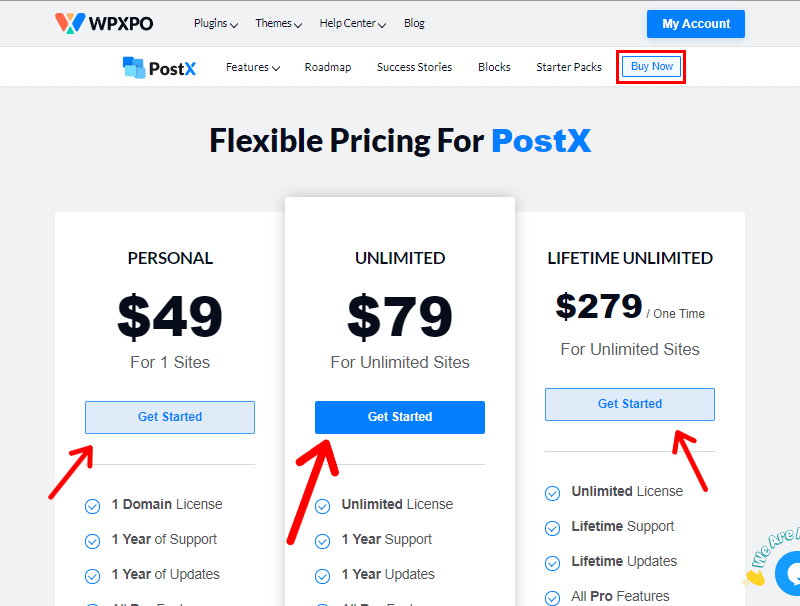
From there, click on the Buy Now button to go to the PostX pricing page. There’re 3 premium options available. Choose any option you see fit and click on Get Started.
After doing so, it’ll open the checkout page. There, enter your payment details, provide your personal info, and create an account. If you have a discount code, enter it to save some money.
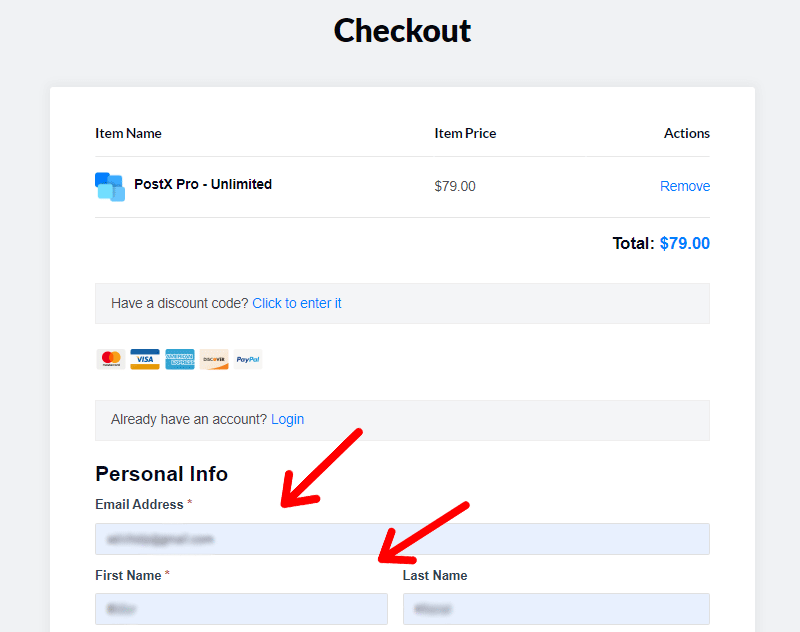
After entering all the details, click on the Purchase button at the end of the page.

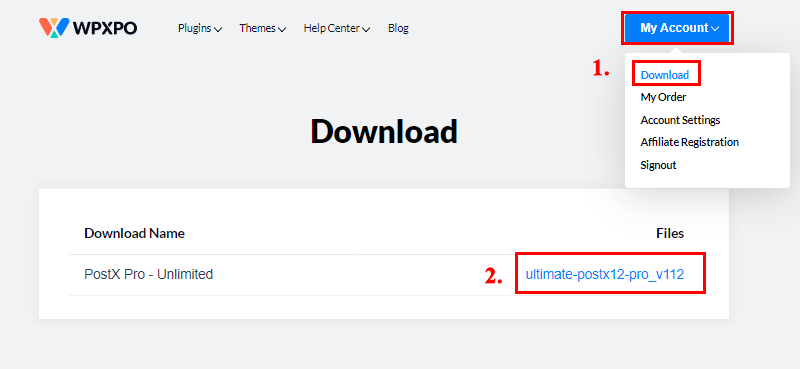
Then, you’ll have created an account on WPXPO where you’ll have access to download the plugin. You’ll get the download link in your email too.
Or, you can go to My Account > Download. Then, click on the link shown below to download it on your local PC.
iii. Installing PostX Pro
Now, to install the premium plugin, go back to your WordPress admin area. Then, go to Plugins > Add New.
From there, click on Upload Plugin, and then click on Choose File to select the downloaded zip plugin file. Then, simply install and activate it.
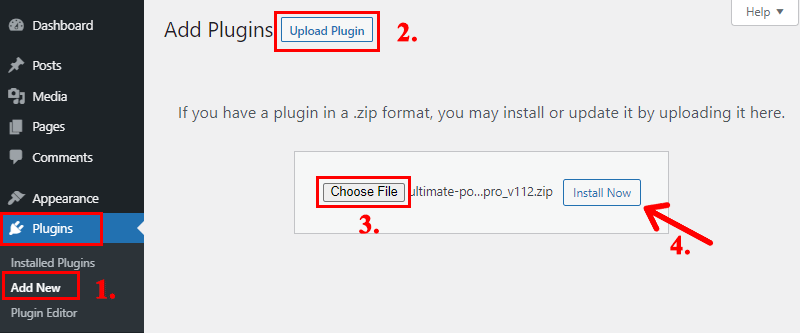
After that, you’ll have your premium plugin added to your admin area. Now, you’ll just have to activate its license to verify your ownership.
iv. Activating PostX Pro
You’ll find your license key in your WPXPO account. So, go back to the WPXPO tab. From there, go to My Account > My Order. Then, click on View Licenses.
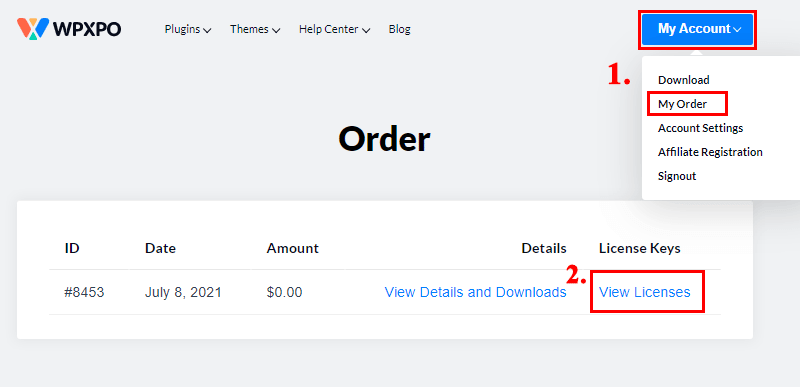
Then, click on the key icon to view your license key. After that, select the 32-digit key and copy it.

Then again, go to PostX > License on the sidebar on your WordPress admin menu. Now paste the copied license key on the text box. After that, click on Check and Save License.
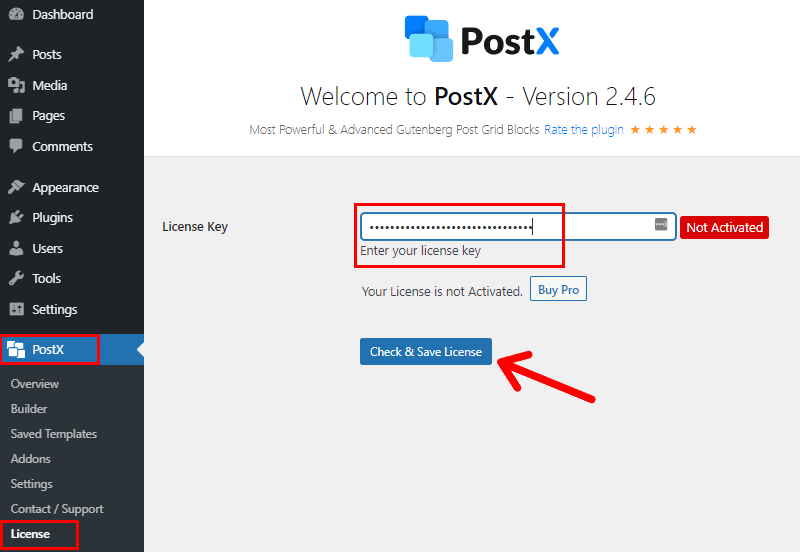
That’s all! Your license key will be activated then.

After that, you’ll have PostX Pro activated on your WordPress website. Now, let’s create a simple blog page using PostX blocks.
v. Creating a New Blog Layout Page with PostX
Before creating the blog page, first, make sure that you have published adequate blog posts in different categories. This will help you understand it even more.
Let’s dive right into creating the page.
So, create a new page by going to Pages > Add New. It’ll open the WordPress native Gutenberg editor.
Since you already have PostX installed, you’ll see all the PostX blocks and the Block Library.

You can use the blocks individually and create your page as your own intuition. We’ve also explained bits of each of the blocks in this article above. So, you can take references from there.
For now, we’re going to create with the Starter Pack on the Block Library. This will format your whole page with a lot of ease and in a few seconds. Also, you get 15 designs to choose from.
So, go to the Block Library and select the design you like from Starter Packs.

You can also preview it live if you want to take a look on full screen. Here’s a link to one of the starter templates – Travel Starter Demo
It looks really good. So, let’s import the same one to our page and see how it looks.
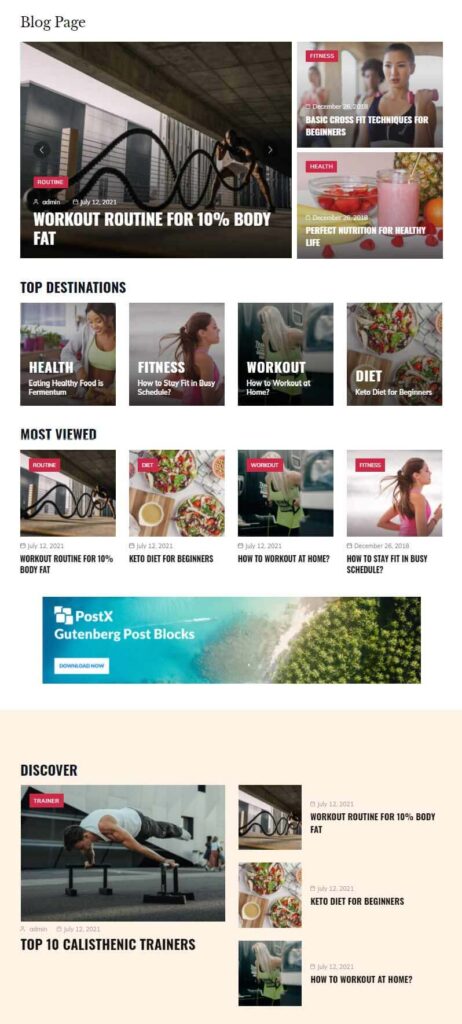
Amazing!
Now, you can publish the page right away if you like what you see. However, we suggest you tweak headings, colors, typography, etc to match your brand assets. And, don’t forget to remove or replace the demo images and content.
You see, PostX makes it really easy to create a post layout page of your desire.
E. PostX Pricing
Till now, you must have understood that PostX offers you out-of-the-box abilities. Its features come head-to-head with many of the expensive alternatives. However, you’ll be surprised to know that PostX is very affordable if compared.
To be specific, you have the option to choose from 3 simple pricing plans of PostX. They are
- Personal Plan: The personal plan costs $49 per year. With this plan, you get a year of license and support for a single domain.
- Unlimited Plan: The 1000 Sites plan offers all the pro features with a year of support and license to 1000 domains. The plan is available for $89 per year.
- Lifetime Unlimited Plan: The 1000 sites plan provides lifetime support and updates to 1000 domains. If you want this plan, you’ll have to pay $303 once and you’re subject to no more payments.
F. Support in PostX
PostX is a pretty simple and straightforward plugin to use. However, there are tons of support options if you ever get stuck. As a result, you can utilize PostX to the fullest.
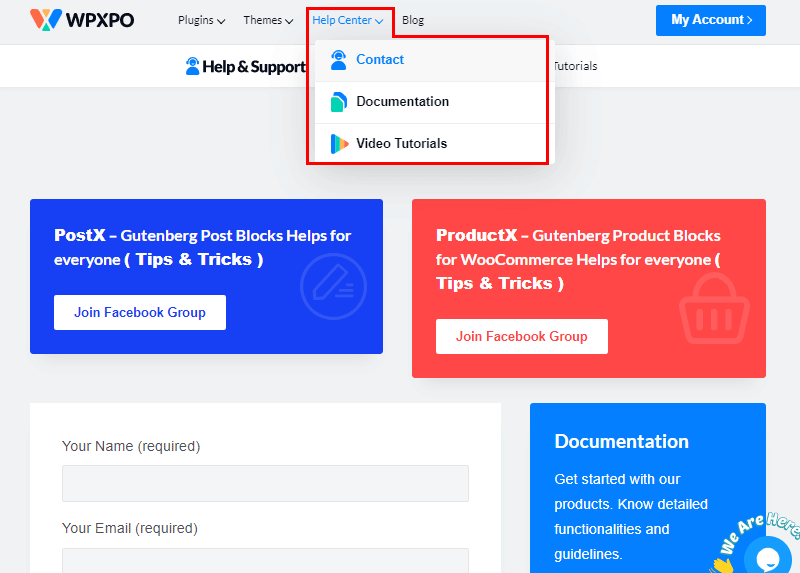
Now, the most common way to figure out your solution is by going through the PostX documentation. There, you’ll find rich articles to guide you in using the PostX blocks and other features. Also, you can search with a query to find a solution to what you’re looking for.
Similarly, it has a YouTube channel dedicated to helping you with getting fluent with PostX. It has introduction videos, and step-by-step tutorials to teach you to create your blog layout pages in no time.
If you’re on any premium plan of PostX, then you’re eligible to receive dedicated support as well. Just type in your name, email, question category, and your question, and then submit it. The help will arrive very soon.
In addition, you can join the PostX Facebook group and engage in discussions.
G. Pros and Cons of PostX
So, what are the pros and cons of PostX? Let’s see.
Pros
- Available for free
- Easy and Intuitive
- 15+ Gutenberg blocks for post-layout designs
- Rich customizable features
- Shortcodes ready
- Regularly updated to get rid of bugs and errors
- Many importable block designs and templates with more on the way
- Compatible with Elementor
- Robust Support
Cons
- These many features could overwhelm beginners.
- The starter library demos can be extended a bit more.
G. Conclusion
There you have it! That’s all for the review of PostX – the powerful Gutenberg post grid plugin.
With our testing of PostX, we found it a robust tool with powerfully customizable blocks and abundant features. And while being extensive, it’s made sure that the users would have a very easy time surfing this plugin.
We absolutely recommend this plugin to our readers. Whether you’re a beginner, a professional blogger, or a content creator, PostX has everything to fit your needs.
You can have additional read on the Yoast SEO plugin review if you’re looking for boosting the organic ranking of your website. Also, check the Rank Math review.