Are you looking for an honest Masteriyo review? Or wondering if it’s the best LMS plugin for your WordPress site? If so, then you’ve come to the right place.
Masteriyo is a revolutionary WordPress plugin that empowers you with a customizable dashboard and robust course management tools. It’s a game-changer for your LMS (Learning Management System) site.
With its extensive range of features, Masteriyo offers unparalleled customization. Making it a must-have plugin for any LMS site.
But, it alone can’t guarantee it’s the best option for your eLearning website, do they?
So, discover how it transforms the eLearning experience and take your site to new heights from this Masteriyo review article.
Without further delay, let’s get started!
Table of Contents
A. Masteriyo Overview
Masteriyo is one of the most powerful WordPress LMS & eLearning plugins. With this plugin, you can easily create and sell online courses, teaching anything, anytime from anywhere.

Moreover, with its advanced features, you can create structured content courses with segments like lessons, quizzes, etc. This makes it easy for you to create, manage, and sell courses online.
Besides, with the single-page application, create a course in one place without switching or reloading the page. Also, students can benefit from an easy and fast learning experience while taking courses. While focusing on the content and not getting distracted by technical issues.
Moreover, this plugin is powered by React JS. This technology allows for quick and seamless updates without refreshing the page. Hence, your readers will have a smooth user experience.
Overall, Masteriyo offers a comprehensive solution for educators who want to take their eLearning business to the next level. Whether you’re an experienced course creator or just starting, Masteriyo is a plugin worth considering for your eLearning needs.
This sums up the overview of the plugin. Now let’s explore its key features.
B. Key Features of Masteriyo
Now, let’s look into the key features of the Masteriyo LMS plugin.
1. Powerful Course Builder
Course builder is an advanced feature of Masteriyo. This plugin offers an intuitive and user-friendly course builder to create engaging courses in a flash. Besides, with its drag-and-drop feature, it’ll be easy for you to manage multiple lessons, quizzes, and assignments.
Moreover, you can easily switch between the course builder tabs menu, and setting without page reload. Also, easily locate your courses under the Masteriyo courses menu. Plus, filter the course by pricing, categories, or keywords.
Additionally, you can make the course more engaging with its comprehensive course settings. It allows you to indicate the level of your course difficulty. You’ll also have the ability to specify the number of students allowed to enroll in the courses.
2. Distraction Free Learning Page
Another fantastic feature of Masteriyo is the distraction-free learning pages. With this LMS plugin, you’ll get an optimized learning page to ensure your learners are safe from unnecessary visual obstructions. Hence, they are more engaged in the course.
You’ll be able to remove the header/footer to create an immersive learning experience. Also able to collapse the sidebar with a simple click to reduce distractions. Besides, this feature only applies to your lessons. This means the rest of your page/post will use your chosen site theme.
3. Quiz Builder
This is another amazing feature that Masteriyo offers. With the help of this feature, you can create compelling quizzes, engage students, and revamp the way they learn online.
Besides, if you’re new to Masteriyo, don’t worry, it’s a beginner-friendly drag-and-drop LMS quiz builder. You can easily add quizzes to the course of your choice.
Not to mention, it allows adding an unlimited number of questions and answers to the quiz. Plus, you’ll be able to customize each question and answer individually. And gain insights into student performance with quiz summaries, results, and overviews.
In addition, you’ll get 9 interactive question types to make your quizzes more interactive. They are:
- True/ False
- Video
- Single choice
- Audio
- Fill in the blanks
- Sortable
- Text answer
- Multiple choice questions (MCQ)
- Match the following
4. In-built Order System
The in-built order system feature allows you to sell courses and manage orders effortlessly. You can add a checkout page, cart system, multiple payment methods, etc, without third-party plugins.
It also supports diverse payment options for your students during course purchases. Currently, it supports 3 payment methods:
- Offline payment
- PayPal Standard
- Stripe payment gateway
Additionally, you can easily manage your orders no matter how big or small your online school. You can effortlessly edit and trash orders from the Orders tab. Also, sort through countless orders without hassle. Plus, organize orders into categories: completed, pending, canceled, etc.
5. Content Drip Feature
Masteriyo plugin offers the content drip feature to help you schedule and drip-feed lessons effortlessly. This feature helps to grab the student’s interest and engagement over time.
Moreover, Masteriyo content drip comes with 4 powerful content flow types.
- Free Content Flow Type: This allows students to randomly enroll in any course and any lessons or quizzes. Plus, students can skip lessons and jump to previous lessons without restrictions.
- Sequential: Students can move forward to another lesson only after completing the current one, as the following lesson/quiz is locked.
- Data Selection: This feature allows you to release certain lessons or quizzes on a specific date.
- X Days from Enrollment: You can release lessons/quizzes after a certain number of days of enrollment. So, if you set drip days as 5 for lessons/quizzes, then it’ll unlock 5 days after enrollment.
6. WooCommerce Integrations
Masteriyo helps you to upgrade how you sell your online course with its integration with WooCommerce. You can incorporate the WooCommerce checkout, payment gateways, and analytics page into your LMS website.
Also, create new products in WooCommerce and associate the product with a course of your choice. And students can add this course to their cart and process the checkout quickly.
Additionally, you can add all WooCommerce payment gateways to your school. Hence giving your students a diverse range of payment options. Some of them are Amazon Pay, GoCardless, Authorize.Net, Paystack, and more.
Moreover, easily overview the overall performance of your sales, orders, etc. You’ll also get a graphic representation of statistics using bars and line charts. Plus, you’ll have leaderboards for top customers, coupons, categories, and products.
7. Additional Features
Besides the aforementioned features, there are various extra features that the Masteriyo LMS plugin offers to you.
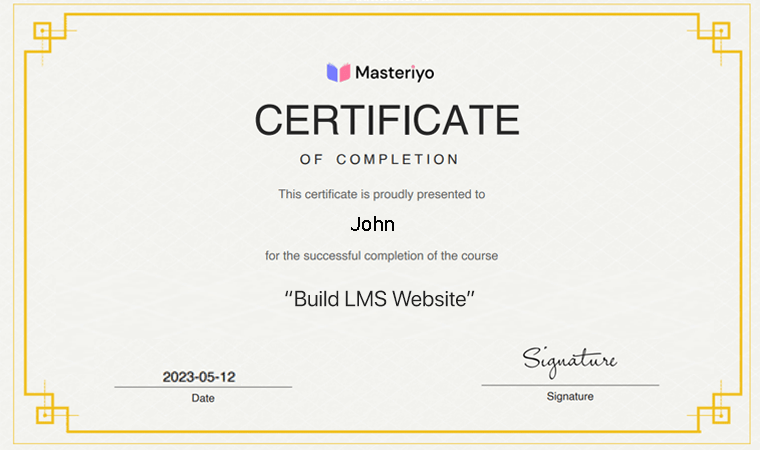
- Easily build and include attractive certificates for each course with Masteriyo certificate builder.
- You can add unlimited instructors and students to your online school and provide them with account pages.
- Also, instructors can add course assignments and evaluate them.
- Ability to create a grading system for evaluating quiz/assignment results.
- It allows you to create coupon codes for premium courses and offer fixed or percent discounts to students, etc.
- The review system allows logged-in users to give individual courses text reviews and star ratings.
- With the password strength checker ensures students and instructors register with a strong password.
So, these are some of the main features that Masteriyo offers. Now, let’s proceed to the next section of this Masteriyo review.
C. How to Create an Online Course with Masteriyo?
In this Masteriyo review portion, we’ll cover the installation of the plugin and setup procedures of the online course.
So, stick with us as we lead you through the following steps.
Step 1: Purchase and Install Masteriyo
The Masteriyo plugin is available in both the free and premium versions. So, in this Masteriyo review article, we’ll learn to install both plugin versions.
So let’s start!
Installing Free Version
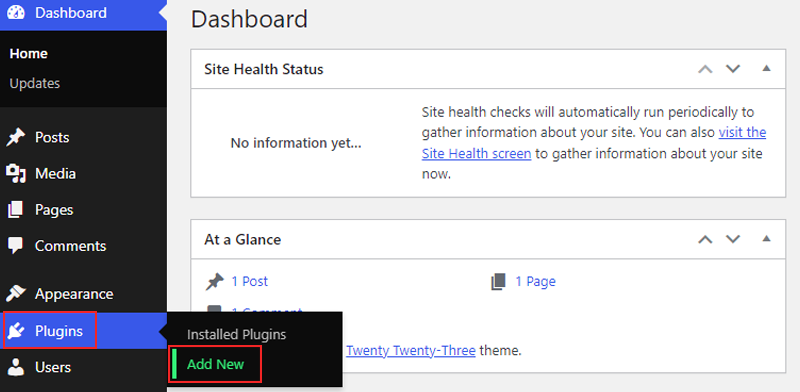
First, let’s go over installing the free version of this plugin. Start by logging into your WordPress dashboard. Then go to Plugins > Add New option on the left menu bar.
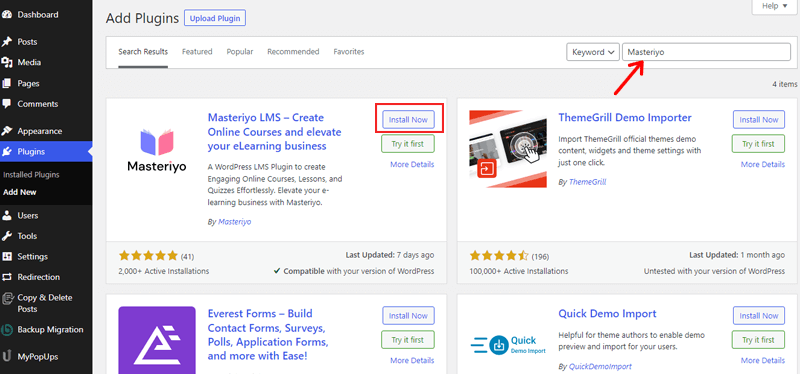
After that, type “Masteriyo” in the search bar and hit enter. Once you find the plugin, click on the “Install” button.
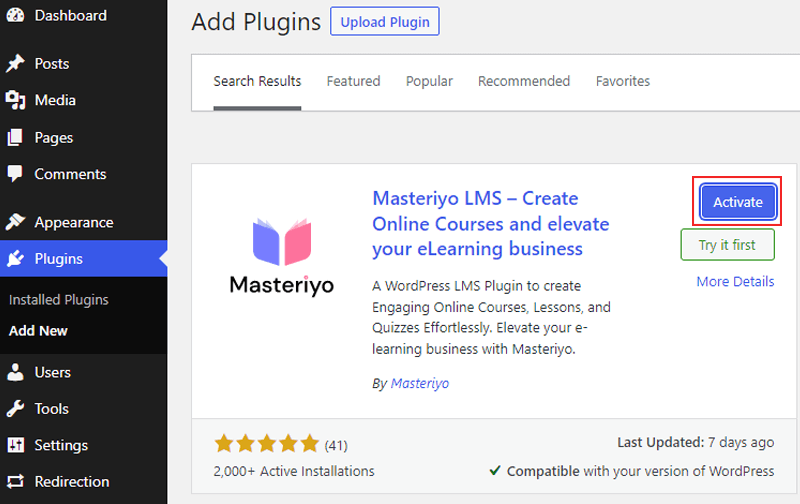
Now click the “Activate” button, and you’re done.
Installing Premium Version
Before installing, you need to purchase the Masteriyo Pro version from its official website. After that, you’ll receive an email with a link to download the zip file and license key. Start by downloading the Masteriyo Pro version zip file.
Also, do not forget to copy the license key from your email. It’s needed to activate the Masteriyo Pro features.
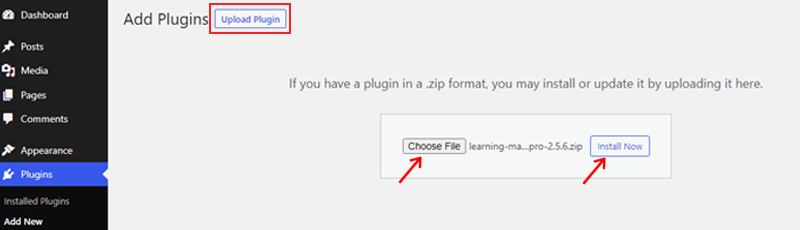
Now to install the plugin, go to your WordPress dashboard, then navigate to Plugins > Add New option on the menu bar.

Then click the “Upload Plugin” button at the top and click on the “Choose File” button. Here you can upload the zip file of the Masteriyo plugin. Once uploaded, click the “Install” Now button
Following that, hit the “Activate Plugin” button.
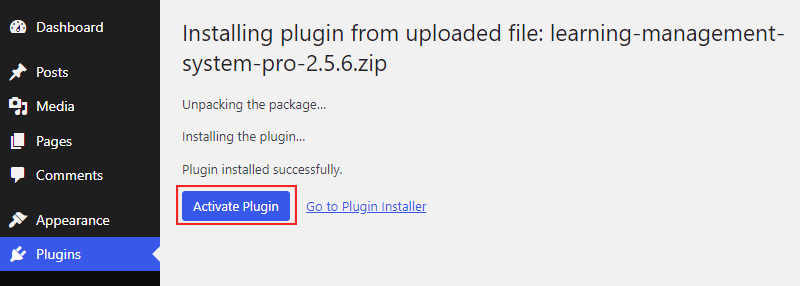
Following that, you’ll get an installation complete message.
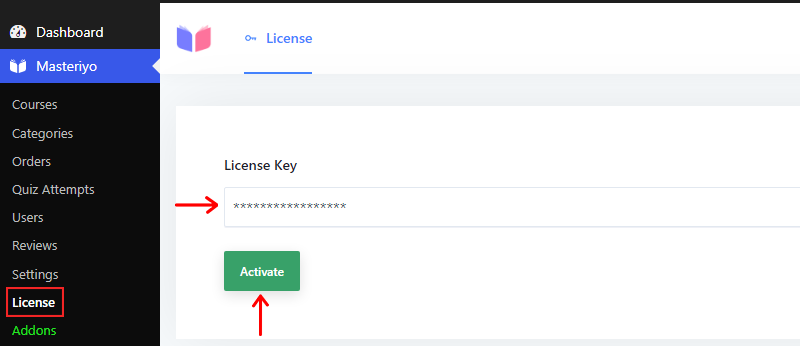
Now, you can go back to your dashboard and navigate to Masteriyo > License option. There, you need to paste the license key you got from your email. Then hit the “Activate” button.
That’s it, and you’re done! Isn’t it easy?
Remember, if you’ve already used the free version, then activating Masteriyo Pro auto-deactivates it’s free version.
Step 2: Setup the Masteriyo Plugin
After you install and activate the plugin for the first time, you’ll be directed toward a setup wizard screen. And with the help of this setup wizard, you can set up your LMS site easily.
Let’s go through each setup process.
The first step is the Welcome screen. It allows you to either start the wizard or skip it and go to your dashboard.
If you’re new to Masteriyo LMS, it’s recommended that you start the setup wizard by clicking on the “Start Now” button.
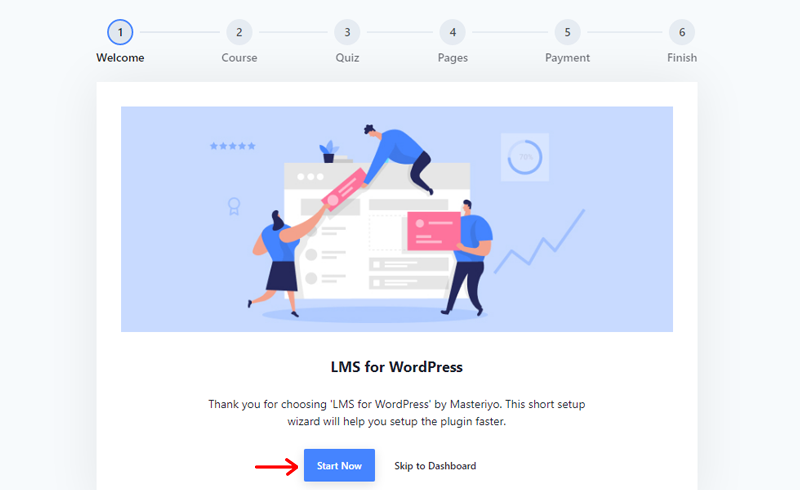
However, if you’re already familiar with Masteriyo LMS and don’t need to run this setup wizard. You can skip the process by clicking the “Skip to Dashboard” button.
After that, you’ll see some options relating to the course. They are:
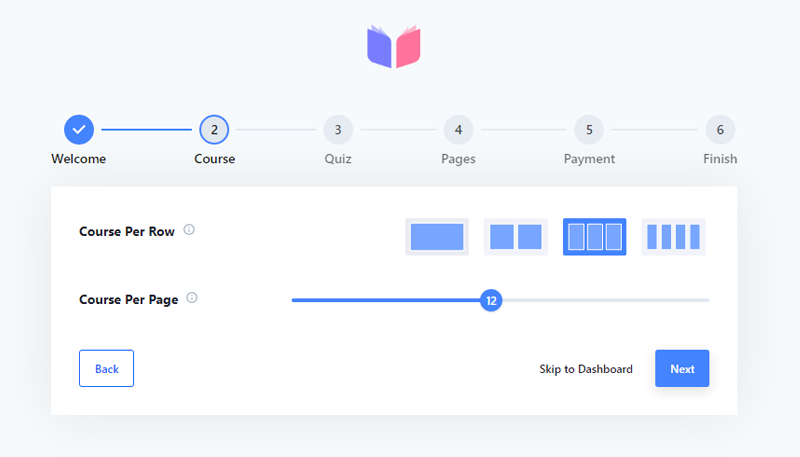
- Course Per Row: This option lets you choose the number of rows to show in a single row on the course listing page.
- Course Per Page: Here, you can choose the total number of courses to display on the course listing page.
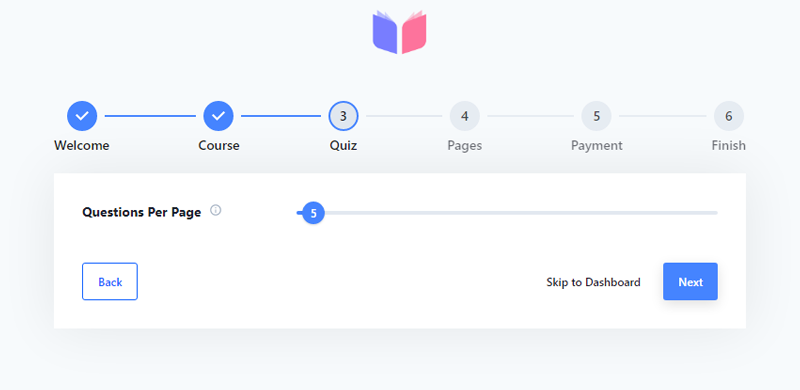
Next, you’ll see a few options relating to the quiz. Here, you can choose the total number of questions to add to a single page or screen.
Following that, you’ll need to configure some pages to run Masteriyo plugin smoothly. Let’s go through them.
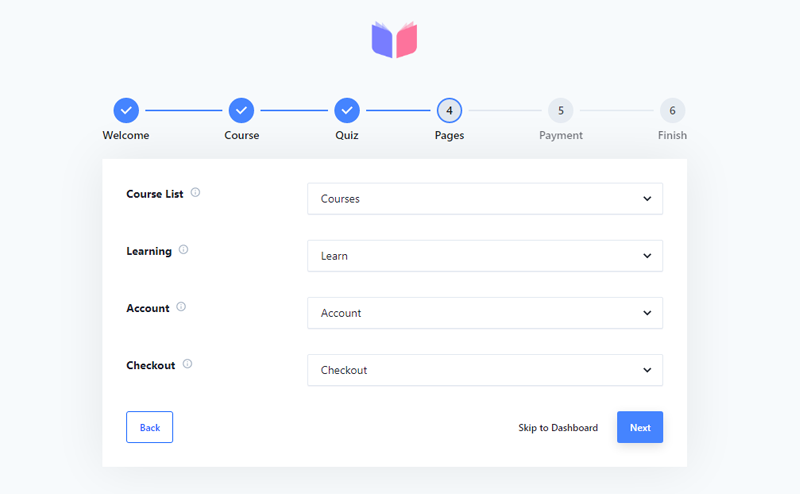
- Course List: in this option, you can select a page displaying all available courses on your website. Plus, the setup wizard will create a new page as “Courses” by default.
- Learning: Here, you must select a page that can show or run individual courses when students start the course. Also, the setup wizard will create a new page as “Learn” by default.
- Account: Going through this step, you must select a page that’ll display the account of any instructor or student.
- Checkout: Lastly, on the page setup option, select the page displaying the checkout page whenever students purchase a course.
The final step of the setup wizard is the payment option. It lets you choose the currency of your payment transactions. However, you’ll have the option of USD by default.
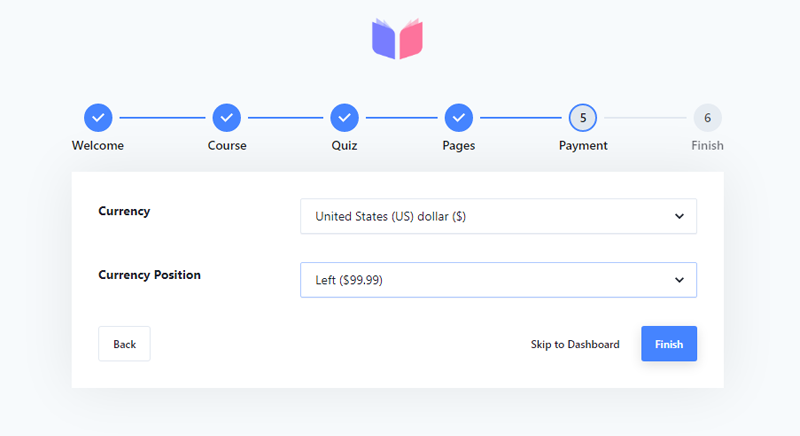
Plus, it lets you choose the side where you want your currency symbol to appear. Also, by default, it’s set to the left of the amount.
Once you complete all these steps, your setup wizard is all done. Now you can start creating courses.
Step 3: Creating Course
Now, we’ll walk you through the step-by-step process of creating and publishing a course using the Masteriyo plugin.
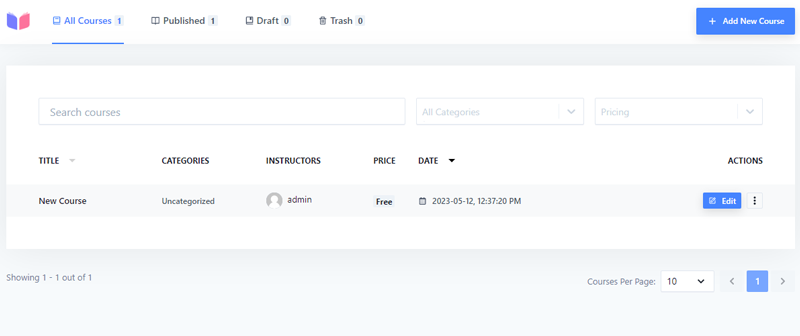
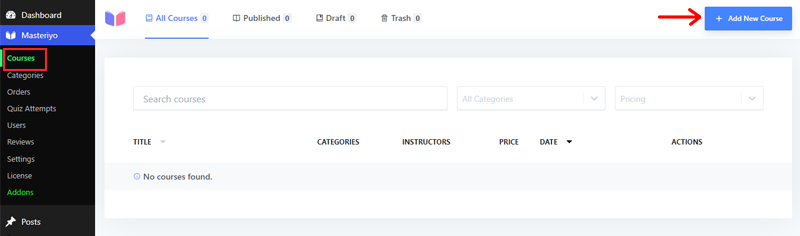
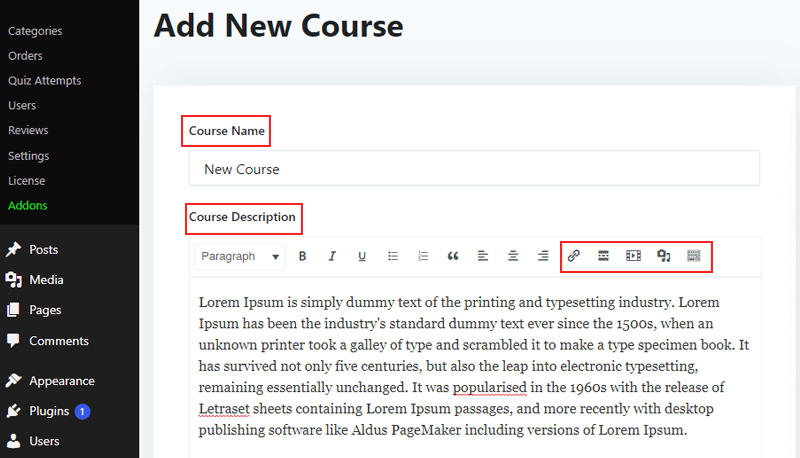
Start by navigating to the dashboard, and go to Masteriyo > Courses. Then click on the “Add New Course” option.
You’ll be directed toward a new course builder interface. Start by adding the course name and description. You can also style the description, add links, videos, images, etc.
On the right side of the editor, you can change the main highlighted features in the “Course Highlight” section. Just below that, it allows you to select a category if you have a category. Or create a new one by clicking the “Add New Category” option.
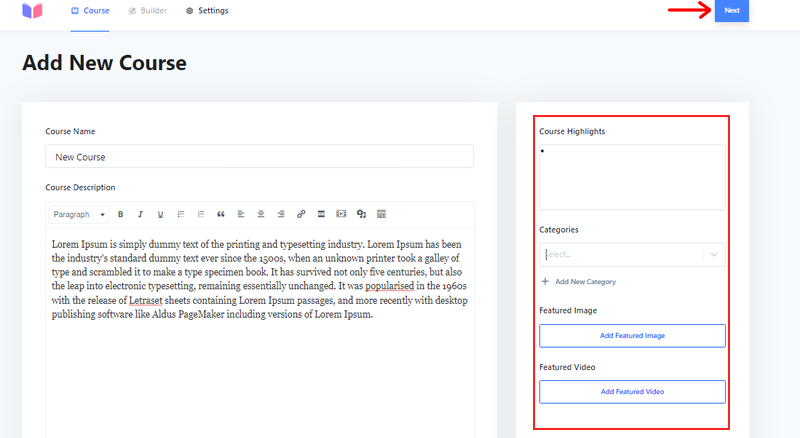
After that, hit the “Next” button in the top right corner. It’ll take you to the “Builder” section.
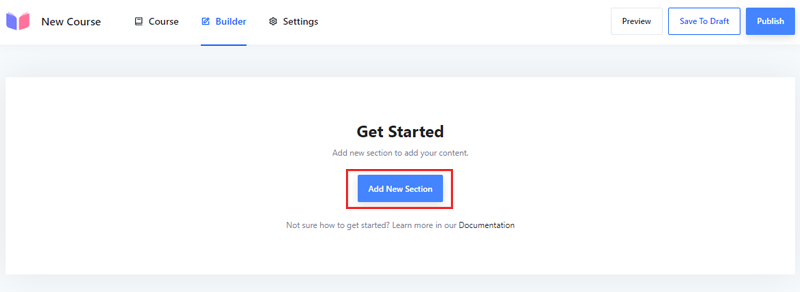
Step 4: Adding New Sections
Now, you can divide every course into sections, which makes it easier for students to navigate.
To start, click the “Add New Section” in the builder area.
Then you need to give it a name in the “Section Name” field and hit the “Add” button.
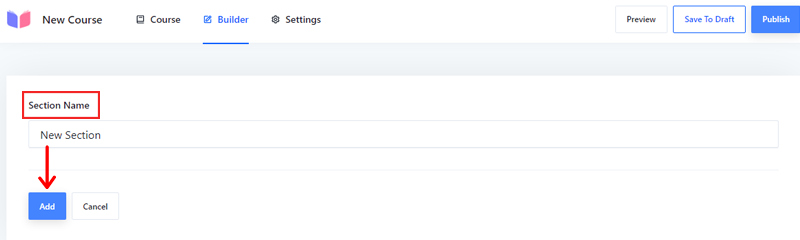
And you’ve easily created a new section.
Moving forward, let’s learn to add lessons in this Masteriyo review
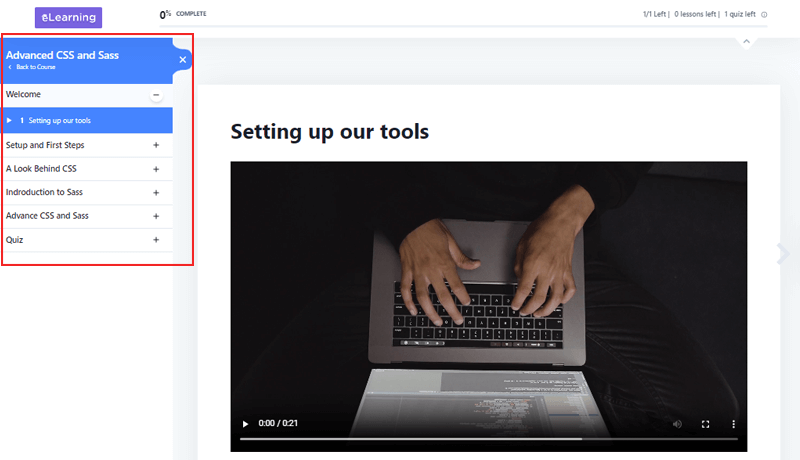
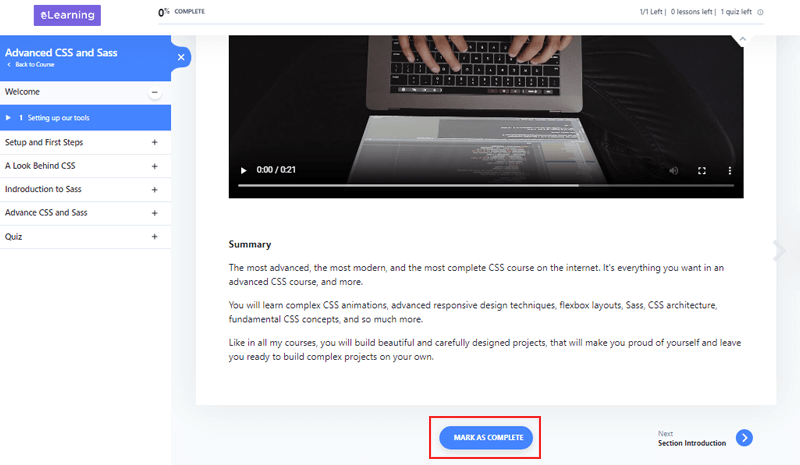
Step 5: Adding Lessons
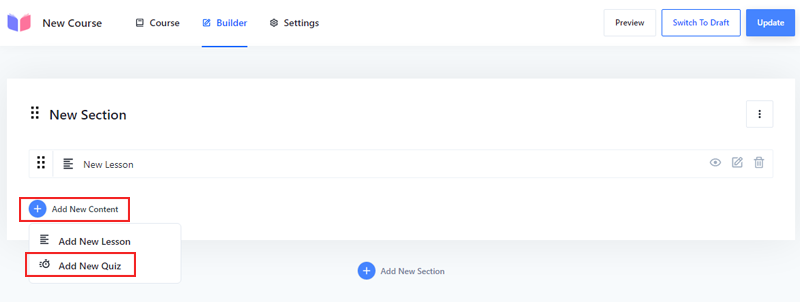
So, after creating a section, you’ll be prompted to a new page where you can add lessons. Simply click on the “Add New Content” option. You’ll find 2 options, “Add New Lessons” and “Add New Qiz.”

Now you can start by going to “Add New Lesson” giving your lesson a name in the “Lesson Name” area. Also, add a brief description in the lesson description editor.
Besides, it allows you to add a featured image if you want one. Just click on the “Add Featured Image” and upload one.
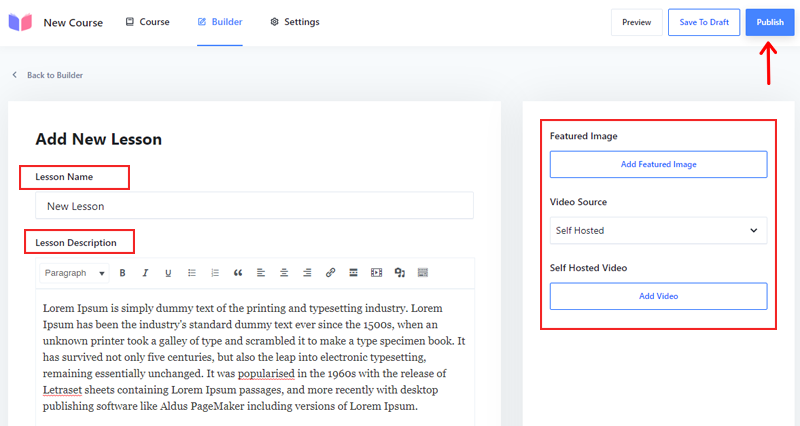
Additionally, you can add a video for the lesson. Masteriyo supports 3 video sources YouTube, Vimeo, and self-hosted. If you choose YouTube or Vimeo, you need to place their URL. Or choose the self-hosted in Video Source and upload the video by clicking Add Video Link.
Once you finish adding all the options, hit the “Publish” button. And you’re done adding the lesson.
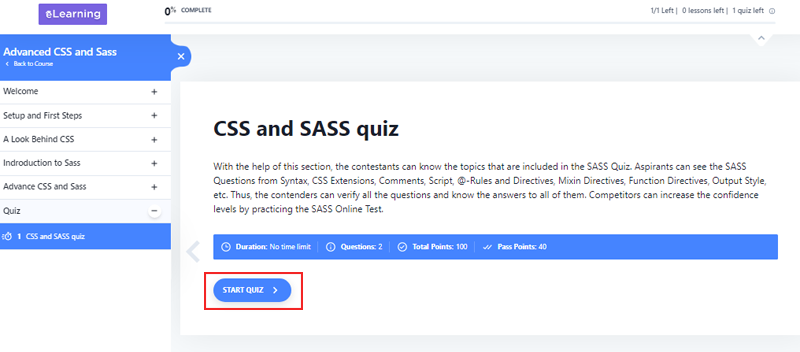
Step 6: Adding Quiz
The quiz section includes a feature that enables you to create and present questions for students to answer. You can assign point values to each question, establish a pass mark, and track the progress of students.
To add a new quiz, click the “Add New Content,” then choose the “Add New Quiz” option.
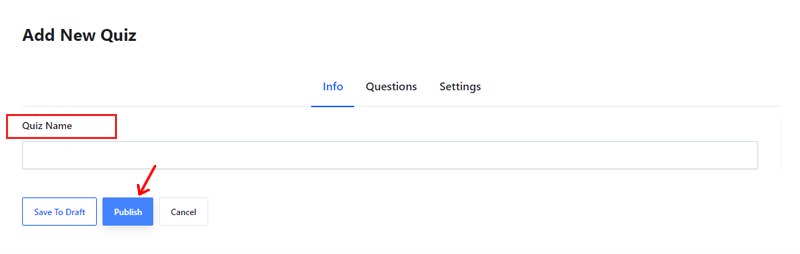
It’ll direct you toward a new interface where you can add quizzes. There, start by giving a name and then hit the “Publish” button.
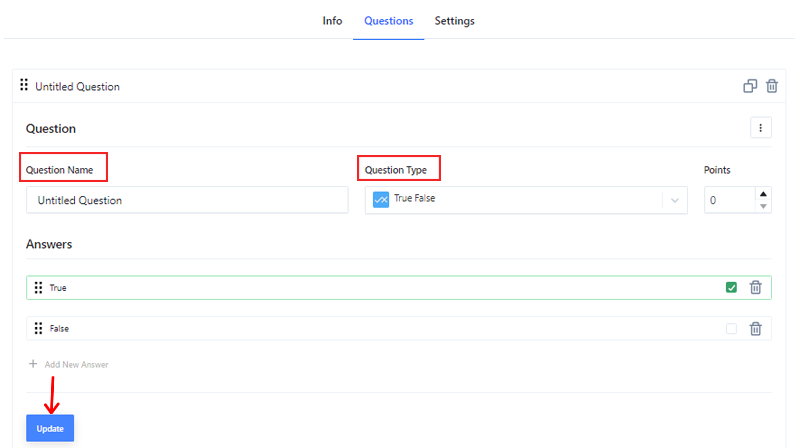
After creating the quiz, you need to add questions. First, click on the “Questions” tab. Then write your question on the “Question Name.” Also, choose “Question Type” from the dropdown.
There are different types of questions: “True False,” “Single Choice.” “MultiChoice,” etc. Once done, then hit the “Update” button to save.
And your quiz is ready to go live.
Step 7: Configure the Course Settings
The next step is to configure the course settings. Each course has its settings. Basically, there are 3 settings, let’s go through them.
i) General
The first one is the general setting, here, you’ll get some basic settings related to courses. We’ll explain them briefly below.
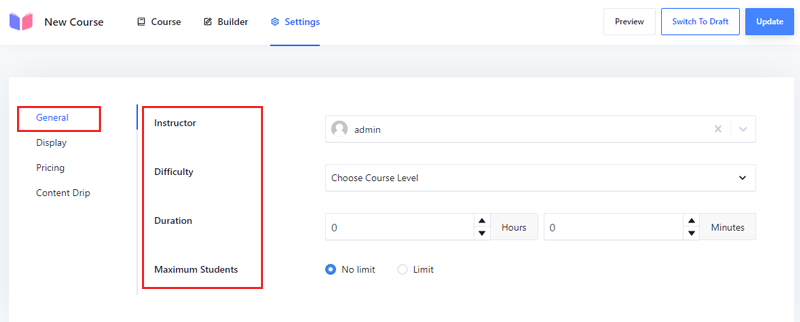
- Instructor: The user who creates courses will appear in this section.
- Difficulty: You can set the difficulty of the course. It can be Expert, Intermediate, or Beginner, depending on the course content.
- Duration: Also set the duration of your courses.
- Maximum Students: This option allows you to set the limit for the students to enroll or make the course available to unlimited students.
ii) Display:
The display option lets you customize how the courses will appear. You’ll have the option to choose either the curriculum to be visible always or only to the enrollers.
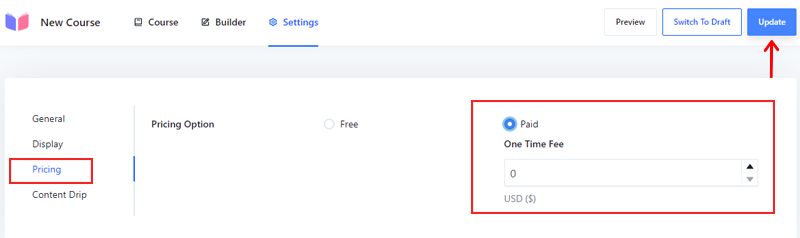
iii) Pricing:
From the pricing tab, you can set the price for the courses.
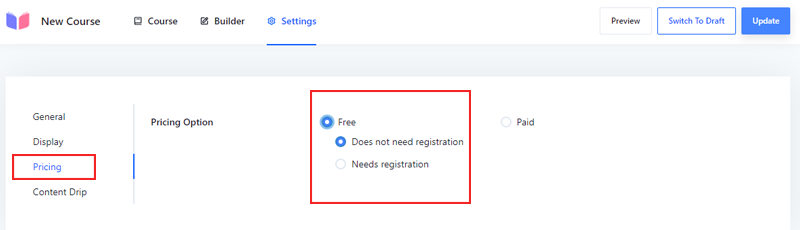
Basically, you can either make the course free or set some price. If you decide to make it free, you’ll have 2 extra options. First, allow students to enroll in your course without registering. And the second is to make registration compulsory.
Whereas if you go with the paid option, you can still set a one-time course fee. Therefore, the enrollers must pay to take courses. And update the setting once you’re done.
And you’ve successfully created a course.
Step 8: Publishing Course
Once you’re done with the course settings, hit the “Publish” button on the top right corner. Besides, you can click the “Preview” option to glance at how your course looks before going live.
D. How Do Students Access the Online Courses?
Now let’s see how students can access online courses in this part of the Masteriyo review.
Once the students visit your eLearning website, they must click on the “Enroll Now” or the “Courses” option.
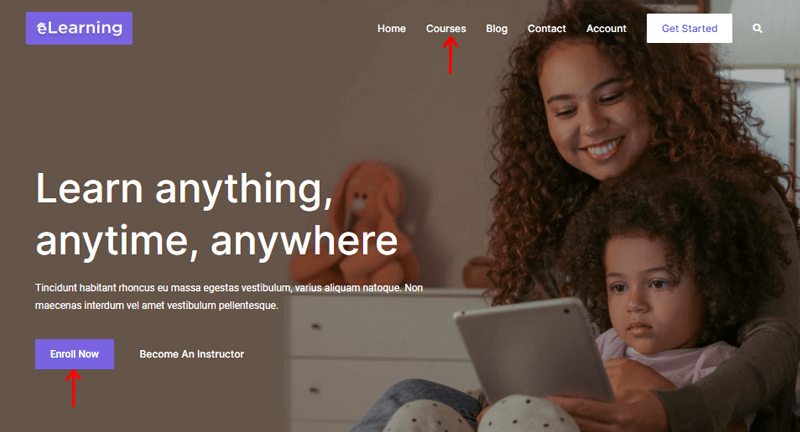
It’ll direct them to the course page, where students can search for the course they want to access by browsing the course catalog. Or by using the search bar at the top of the page.
Once students find the course they want, they can click on the course name to view the course details. To enroll in the course, they should click on the “Start Course” button.

This will take them to the course page, where they can view the course materials, lectures, assignments, and other resources.
Once the course is complete, they can make it “Complete” from the bottom of every course.
Then they can start the quiz after completing the courses, simply hit the “Start Quiz” button. This will allow them to access all the quizzes you’ve created for your course.
Once students complete the course, they’ll get the Certificate of Completion if they’ve successfully passed the test.
With that, let’s move forward to the next section of the Masteriyo review.
E. Cost of Creating Online Course with Masteriyo
Masteriyo offers both free and premium pricing plans. You can easily install the plugin from your WordPress dashboard for free. Or get it from the official plugin directory of WordPress.org.
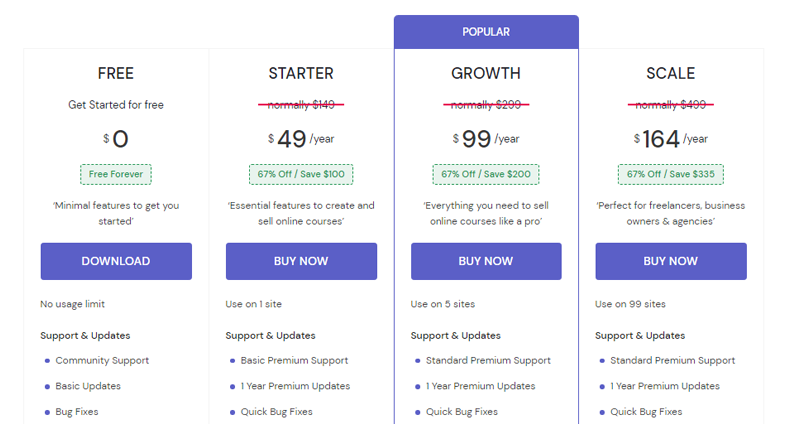
Besides, to upgrade to its pro version, it offers 3 pricing plans on its official website.
- Starter Plan: Costs $49 per year with uses on a single site. It includes basic premium support, quick bug fixes, a course archive filter, external URL video support, etc.
- Growth Plan: Costs $99 per year with uses on 5 sites. It has a grade book, Zoom integration, coupons, content drip, multi-instructor, and more.
- Scale Plan: Costs $164 per year with uses on 99 sites, perfect for freelancers, business owners, and agencies. It has everything from the growth plan and more.
Besides, your purchase is covered by a no-risk 14 days money-back guarantee.
F. Is Customer Support in Masteriyo Good?
Support is something you must look up, along with features and prices. Though Masteriyo is a simple-to-use and user-friendly LMS plugin. But it doesn’t imply that you won’t face any challenges.
Fortunately, you’ll get first-class support from the Masteriyo team. It offers comprehensive documentation where you can find articles for getting started. You’ll also get the live demo of Masterityo without having to install it on your system.
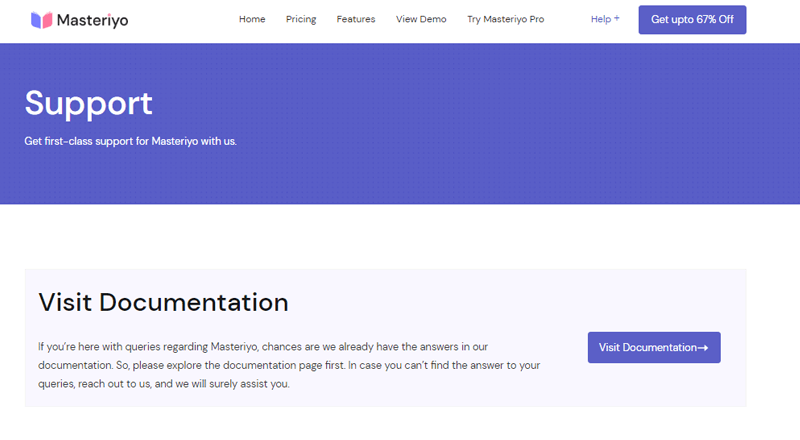
Furthermore, you can visit their YouTube channel to get beginner-friendly video tutorials for all users. There you can learn about Masteriyo setup, its usage, and more.
In addition, you can easily find answers to your most common question from their FAQ section. It covers various topics, from features, setup, and premium plans, to refunds and prices. The best part is you can directly connect with their support team via live chat.
Besides, if none of the resources does not solve your queries, you can reach out to the team through the form. There you can choose your query type from sales, support, marketing & collaboration, or others. You can also add a screenshot of the problem while using Masteriyo.
With that, let’s move onto the next section of the Masteriyo review.
G. Pros and Cons of Masteriyo
Everything has its merits and drawbacks. That implies the Masteriyo plugin has its own advantages and disadvantages. So, let’s explore them in this section of the Masteriyo review.
First, let’s start with the pros:
Pros of Masteriyo LMS Plugin
- You can add unlimited courses, quizzes, and lessons.
- Also supports external URL video.
- You’ll be able to add unlimited instructors and students.
- It provides security features including password strength checker and Google reCAPTCHA.
- Integrates well with WooCommerce and Stripe payment gateway.
- Allows users to give star or text reviews to your courses.
Cons of Masteriyo LMS Plugin
- Most of the advanced features are available on the premium version only.
- For the starter plan, you only get to use this plugin on 1 site.
H. Ideal WordPress Themes to Use with Masteriyo
Here is the list of WordPress themes that works well with the Masteriyo plugin. Let’s take a look at them.
1. eLearning
eLearning is a highly customizable ultimate WordPress LMS free theme. As this plugin is powered by Elementor and Masteriyou LMS plugin, you can easily create a professional and engaging online course.
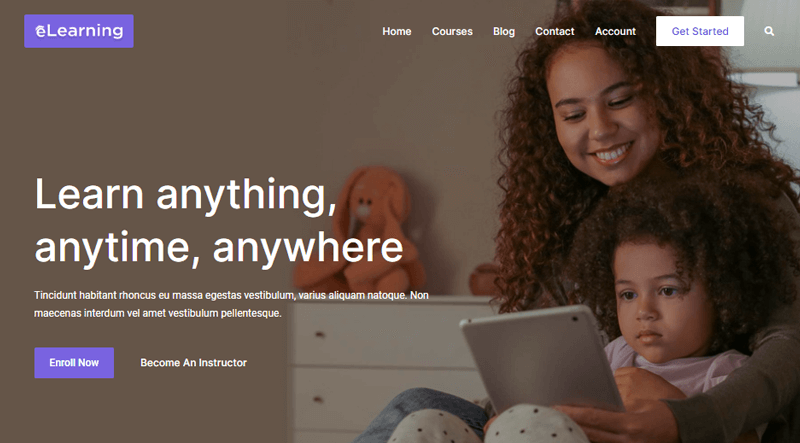
With its lightweight design, the eLearning theme loads quickly. As a result, it facilitates efficient and effective learning experiences.
Besides, it offers beautiful ready-to-import starter templates. Also, you can easily import with just a single clock. Plus, replace everything with your original content to match your website’s brand.
2. Astra
Another on our list is Astra, one of the most popular WordPress themes to create any type of website. This theme is well-known for its super-fast performance and various customization options, from the header/footer to color and typography.
Additionally, Astra’s integration with LifterLMS and LearnDash makes it an ideal choice for creating and selling online courses. Not to mention, it comes with pre-built sites that you can use as a starting point for your site.
Therefore, you don’t need to waste your time working with codes to achieve professional online course design. Additionally, it comes with a custom plugin that allows you to design your custom sales page for your courses.
3. Zakra
If you’re using the Masteriyo plugin for your LMS site, then Zakra is an excellent option to consider. It’s a top-rated multi-purpose WordPress theme with a collection of starter templates, including LMS.

Furthermore, its compatibility with the Masteriyo plugin makes it an ideal choice for creating an LMS site. Together, this dynamic duo creates the perfect LMS website that’s both functional and visually appealing.
Not to mention, you’ll get all the LMS features, including a distraction-free learning page, course progressive bar, course navigation, etc. Plus, make your courses engaging with quizzes. Also, add unlimited lessons and quizzes to your course with a drag-and-drop course builder.
With that, let’s move forwards to another section of the Masteriyo review.
I. Alternatives to Masteriyo LMS
While the Masteriyo LMs plugin is a great option for building online courses, it’s always wise to consider alternatives. There are several LMS plugins out there that might better suit your needs and preferences.
1. Tutor LMS
Another powerful alternative to the Masteriyo LMS plugin is Tutor LMS. This eLearning and online course solution allows you to create and sell courses online easily.
It is one of the fastest growing LMS plugins and now powering more than 80000 of websites.
This plugin helps to create challenging and fun quizzes for your students. You can also offer interactive lessons and access powerful reports to track your student’s progress.
Moreover, in terms of design, it offers built-in sleek designs with multiple layouts. You can create a striking course catalog and course details pages that match your brand. Plus, you can personalize the dashboard for teachers and students, making it easy to manage everything from one spot.
Pricing:
Best of all, it’s a freemium plugin, which means it’s available in both free and premium versions. The free version is easy to download from the official plugin directory of WordPress.org.
Whereas the premium version is available on its official website with 3 pricing plans.
- Individual Plan: Costs $199 per year with a single site license, update for 1 year, and 1 free installation service.
- Business Plan: Costs $399 per year for 10 site licenses, 2 free installations, priority email support, etc.
- Agency Plan: Costs $799 per year with unlimited site licenses, updates for 1 year, priority email support, and 5 free installation services.
2. LifterLMS
LifterLMS is one of the secure WordPress LMS plugins with robust features to create and sell online courses. Using this plugin, you can simply transform your site into a professional eLearning platform.
It offers many features that appeal to multiple learning styles, including video, audio, text, image-based lessons, etc. This makes it easy to create dynamic multimedia lessons that keep students engaged and focused on their learning goals.
LifterLMS makes it easy to create a multi-instructor platform if you teach in teams. You can assign multiple instructors to a course, ensuring students receive a well-rounded education. Additionally, LifterLMS allows you to import a course from one site to another easily.
Pricing:
The best part is that LifterLMS is available in both free and premium versions. You can install the free version from your WordPress dashboard. Or download it from the official plugin repository of WordPress.com.
Also, if you want to upgrade to the pro version, then it’s easy to purchase from its official website. It has 4 premium pricing plans.
- Earth Bundle: Costs $199 per year for single active sites. It comes with unlimited support for a single user, E-commerce Add-ons for Stripe, PayPal, etc.
- Universe Bundle: Costs $360 per year for 5 active sites. It provides unlimited support for 2 users, a Sky Pilot theme, 4 Ecommerce add-ons, and more.
- Infinity Bundle: Costs $1200 per year for unlimited active sites. You’ll get unlimited support for 3 sites, everything from the universe bundle, 9 advanced add-ons, and more.
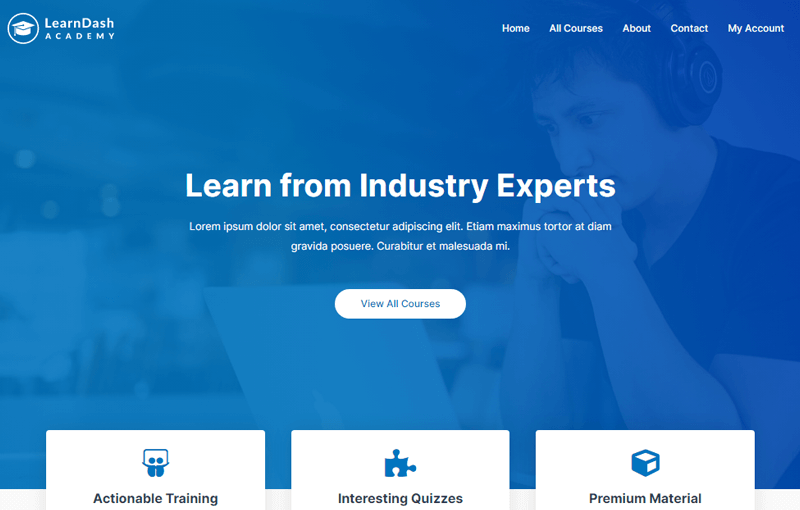
3. LearnDash
If you’re looking for an alternative to the Masteriyo LMS plugin, then LearnDash is an excellent option to consider. It’s one of the most powerful learning management systems for WordPress.
With LearnDash, you can create courses with flexible pricing models and customizable designs. Additionally, it offers certificates, quizzes, and assignments to keep students engaged. Ensuring that your learners are engaged and motivated throughout the learning process.
Besides, it offers robust features like drip-feed content, embed videos, and setting prerequisites or required lessons to keep learners on track. This ensures your learners are making steady progress and are well-prepared for each subsequent lesson.
Pricing:
This robust LMS plugin is available on premium plans from its official website. There are 3 pricing plans:
- 1 site Plan: Costs $199 per year
- 10 Sites Plan: Costs $399 per year
- Unlimited Plan: Costs $799 per year
Plus, all the above plans include updates and support.
J. Final Thoughts – Is Creating Online Courses Easy with Masteriyo?
After thorough testing and evaluation, we are pleased to say, it’s a reliable and feature-rich WordPress LMS plugin. With its diverse range of features, Masteriyo offers you the ability to customize the online course as you like.
Among the standout features of Masteriyo, the Q&A section, Content Drip, and Certificate Builder have particularly impressed us. These robust features are likely to be favorites among many users, providing valuable tools to enhance their LMS sites.
As you embark on your journey with this exceptional plugin, it’s tempting to explore and utilize all its features right away.
However, we advise you to consider selecting only the features that you currently require. This will allow you to focus on the functionalities that align with your immediate needs and gradually explore the others as you progress.
Ultimately, we highly recommend giving Masteriyo a try. It’s a plugin that is worth exploring for its potential to enhance your LMS site and improve the overall eLearning experience.
Conclusion
And that’s a wrap, folks! We’ve come to the end of our article on the Masteriyo review WordPress LMS plugin.
Hopefully, we believe that you could understand all that we discussed in this MAsteriyo review. With the help of this plugin, you can precisely craft online courses in no time.
Even so, if there’s anything we missed or unclear in this Masteriyo review, please let us know in the comments section.
Also, do check out our other related review articles. Such as the AidWP review and Product X Review.
Lastly, do follow us on our social media handles Facebook and Twitter to keep up with us.