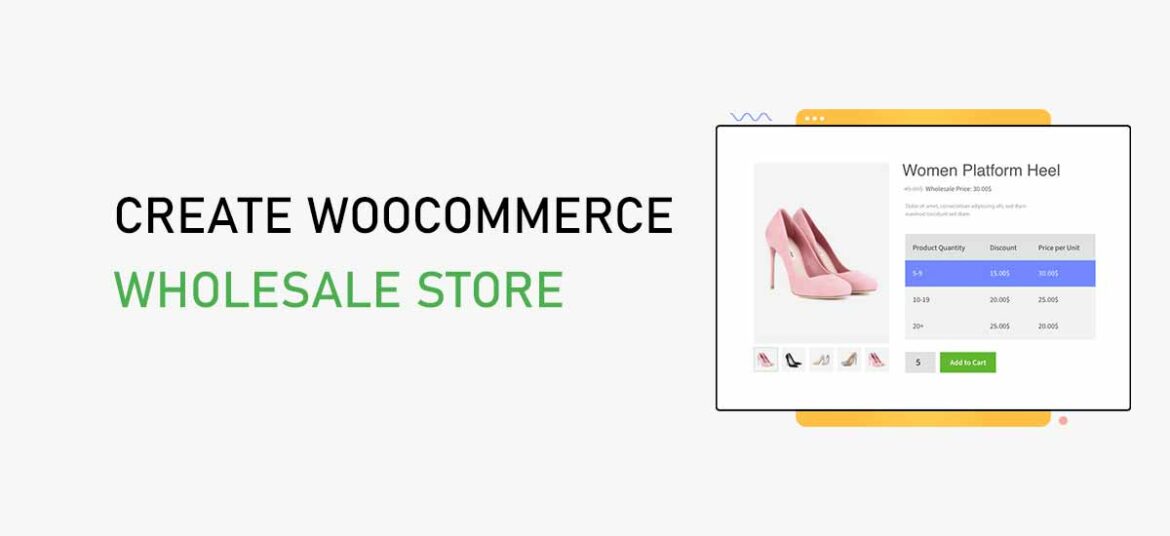
Are you ready to create a WooCommerce wholesale store? Or want to unlock the gateway to a world of wholesale possibilities? If so, then you’re at the right place!
Having a successful WooCommerce store with a loyal customer base means your products are flying off the virtual shelves. But what if there’s a whole market segment you’ve barely tapped into?
Wholesaling opens up a world of opportunities where larger orders and bulk transactions can boost your revenue. However, it’s not just about slashing prices and hoping for the best.
Whereas, creating a WooCommerce wholesale store requires a strategic approach. It’s more than just a flip of a switch, it’s about designing a seamless shopping experience for wholesale buyers.
In this comprehensive guide, we’ll go through the simple process of setting up your WooCommerce wholesale store. We’ll dive into the nuances, strategies, and plugins that can turn your existing eCommerce venture into a thriving wholesale powerhouse.
So, fasten your seatbelts as we navigate the exciting world of wholesale eCommerce, step by step.
Table of Contents
Understanding the Need for a WooCommerce Wholesale Store
A WooCommerce wholesale store is where businesses sell products in large quantities to other businesses. It’s like a special club for bulk buyers.
Also, this setup lets sellers offer discounted prices, making it cost-effective for buyers. So, it’s a win-win for businesses looking to buy a lot at once.
Today having a WooCommerce wholesale store is a smart move. It helps you serve other businesses, grow your customer base, and make more money.
It also lets you build strong customer relationships and run your business more efficiently. You can offer different prices, learn from data, and look more professional.
Besides, there are other benefits of having a WooCommerce wholesale store. Let’s look at them.
- Wholesale stores reach B2B customers, expanding your market and increasing revenue potential.
- They provide an additional income stream, reducing reliance on a single source.
- Wholesale customers tend to be loyal, fostering long-term relationships and repeat business.
- Having wholesale stores streamlines order processing, saving time and resources.
- You can implement various pricing strategies, adapting to different customer needs.
- Access to sales data allows data-driven decision-making and strategy improvement.
- A well-crafted wholesale store showcases professionalism and commitment to quality.
Having said that, let’s learn about the best WooCommerce wholesale plugins in the next section!
Best WooCommerce Wholesale Plugins
When it comes to creating a WooCommerce wholesale store, you’ll want to consider using specialized plugins to streamline the process.
Here are some of the best WooCommerce wholesale plugins to help you get started.
1. WholesaleX
WholesaleX is a dynamic WooCommerce plugin that revolutionizes how businesses handle wholesale operations. This plugin is packed with an array of amazing features. So, WholesaleX is your gateway to a seamless, efficient, and highly profitable wholesale selling experience.
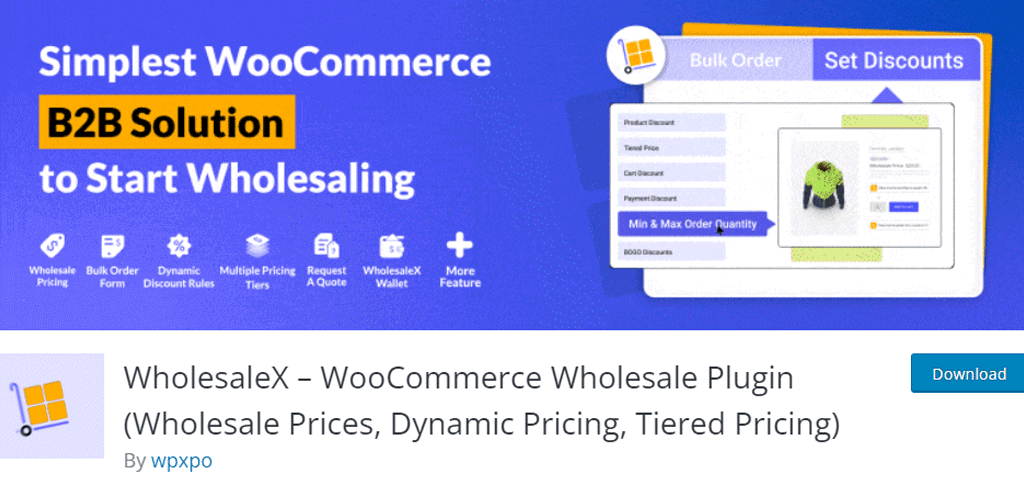
Moreover, it allows you to create custom registration forms for wholesale customers. This means you can gather specific information from your wholesale buyers during registration. Ultimately enhancing your wholesale business efficiency and customer satisfaction.
Key Features:
- WholesaleX empowers you to set up tiered pricing structures, allowing you to offer different rates to various customer groups.
- Easily define minimum order quantities to ensure efficient wholesale order processing and manage inventory effectively.
- Also, it allows you to create distinct wholesale user roles with specific privileges and access levels.
- You can designate exclusive wholesale-only pages, delivering a personalized and controlled shopping environment.
- WholesaleX seamlessly integrates with various payment gateways, ensuring secure and hassle-free transactions.
- Efficiently process large wholesale orders, saving time and resources while maximizing productivity.
Pricing:
This is a freemium plugin that comes in both the free and premium pricing plans. You can easily get the free version from the official WordPress plugin directory.
The premium version, it’s available on its official website with different pricing plans starting from $103 per year.
2. Wholesale Suite
Wholesale Suite is a versatile WooCommerce plugin that empowers businesses to manage wholesale operations within their online stores easily. This robust tool is an ideal choice for implementing wholesale pricing strategies seamlessly.
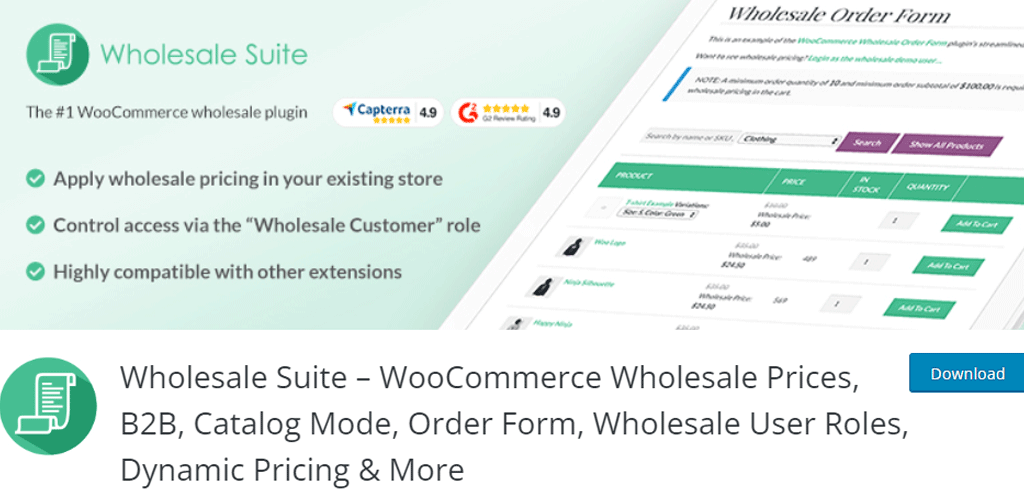
Besides, its dynamic pricing rules allow you to establish flexible pricing structures based on cart totals, product categories, etc. This level of customization empowers you to create intricate pricing strategies. Hence, your wholesale customers will receive precisely tailored pricing.
Key Features:
- Assign specific pricing levels to different user roles, ensuring tailored rates for retail and wholesale customers.
- Streamline bulk ordering with a user-friendly form, enhancing the wholesale shopping experience.
- Set minimum order requirements to optimize order processing efficiency.
- Implement tiered pricing structures based on order quantities, encouraging larger purchases.
- Control which products are visible to wholesale customers, tailoring their experience.
- Easily create and manage dynamic discount rules for wholesale buyers.
Pricing:
You can get the free version of this plugin from the official plugin repository of WordPress.org.
It also has the premium version available on its official website with a starting price of $148.50 per year.
3. WooCommerce B2B
WooCommerce B2B plugin is a powerful tool designed to enhance your wholesale eCommerce experience. It opens the door to a world of opportunities for B2B (business-to-business) transactions within your WooCommerce store.

Additionally, its Quick Order functionality simplifies the ordering process. It allows wholesale buyers to swiftly add multiple products to their cart using SKU (Stock Keeping Unit) or product names. Therefore, it simplifies the checkout process and improves overall efficiency.
Key Features:
- Assign specific roles to wholesale customers for tailored experiences and access control.
- Implement dynamic pricing tiers based on customer roles, fostering flexibility in pricing strategies.
- The Request for Quote (RFQ) System facilitates negotiation and quoting processes to enhance communication with wholesale clients.
- Efficiently manage and approve wholesale customer registrations with the help of wholesale registration and approval features.
- Easily set and enforce minimum order quantities to meet the unique demands of wholesale transactions.
- Also tailor your product visibility for different customer roles, offering personalized catalogs for wholesale buyers.
Pricing:
WooCommerce B2B is a premium plugin available on its official website for $12.42 per month.
Our Recommendation
We highly recommend the WholesaleX plugin for creating a WooCommerce wholesale store. Having thoroughly used and reviewed it, we’ve found it to be an exceptional tool that’ll supercharge your wholesale e-commerce store.
Let’s take a quick look at some of its cool features:
- You can set up tiered pricing, group-based pricing, and even role-based pricing.
- Also, tailor your product offerings for specific wholesale customers or groups.
- Ensure that your wholesale orders meet your desired thresholds by setting minimum order quantities or order values.
- Simplify the ordering process for your wholesale customers with intuitive bulk order forms.
- Allows you to choose which products are visible to wholesale customers and which are not.
- You can efficiently manage wholesale orders with dedicated tools for tracking, processing, and fulfilling larger transactions.
Therefore, WholesaleX is a robust and user-friendly solution that helps to create a seamless wholesale shopping experience. It’s a must-have plugin for anyone looking to excel in the world of wholesale e-commerce.
So why not give it a try?
Create a WooCommerce Wholesale Store Using WholesaleX Plugin
Now, let’s dive into the process of building a fantastic WooCommerce wholesale store with WholesaleX. Follow these steps closely to create your online store.
Remember, you have the flexibility to choose from various popular WordPress themes. In this guide, we’ll work with the Astra theme, a user-friendly theme compatible with many plugins.
Let’s walk through how to install the WholesaleX plugin on your WordPress website.
Install and Configure WooCommerce
To use the power of the WholesaleX plugin, first, make sure you have WooCommerce installed. If you don’t have this plugin, then here’s a simple step-by-step:
Log in to your WordPress website’s admin panel. Once you’re in the dashboard, go to “Plugins” > “Add New” option.

Now search for the WooCommerce plugin, and click on the “Install Now” button.
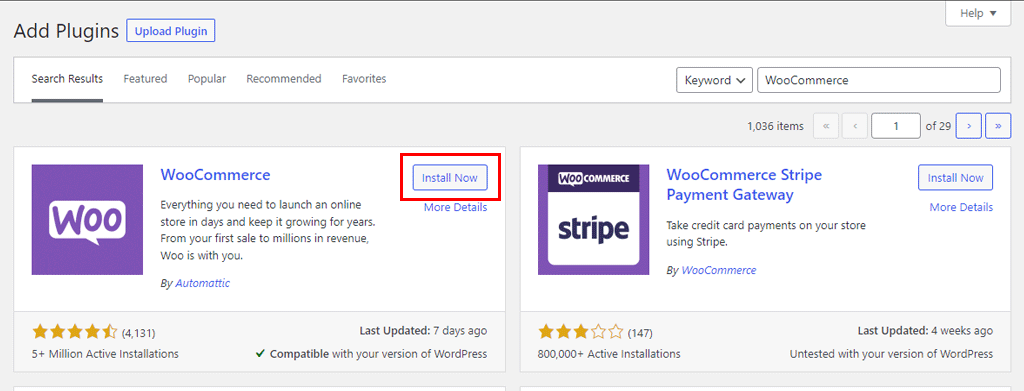
Once the installation is complete, click on “Activate” to enable the WooCommerce plugin.
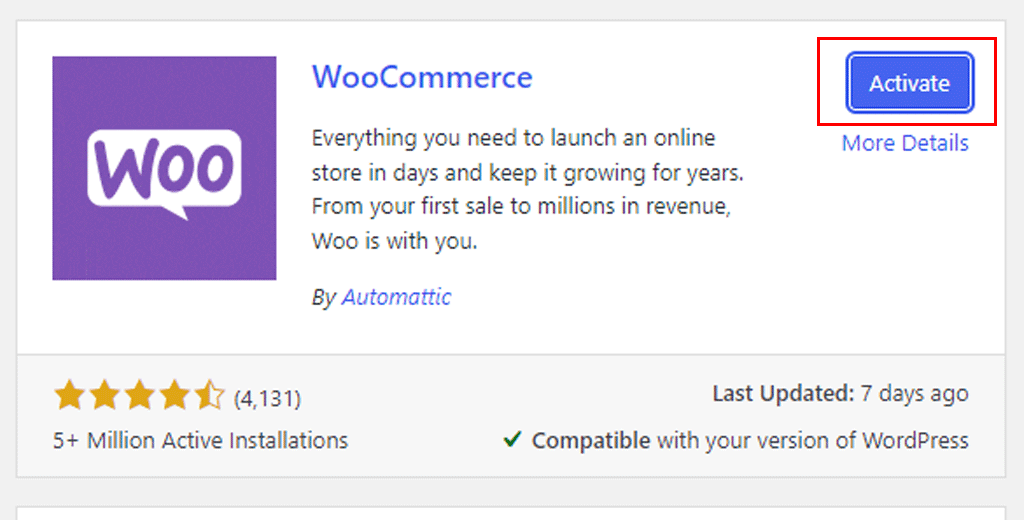
And you’re done!
Configuring WooCommerce Plugin
Now let’s quickly learn to configure currency and product settings using this plugin.
First, go to the “WooCommerce” menu on your dashboard and click “Settings.”
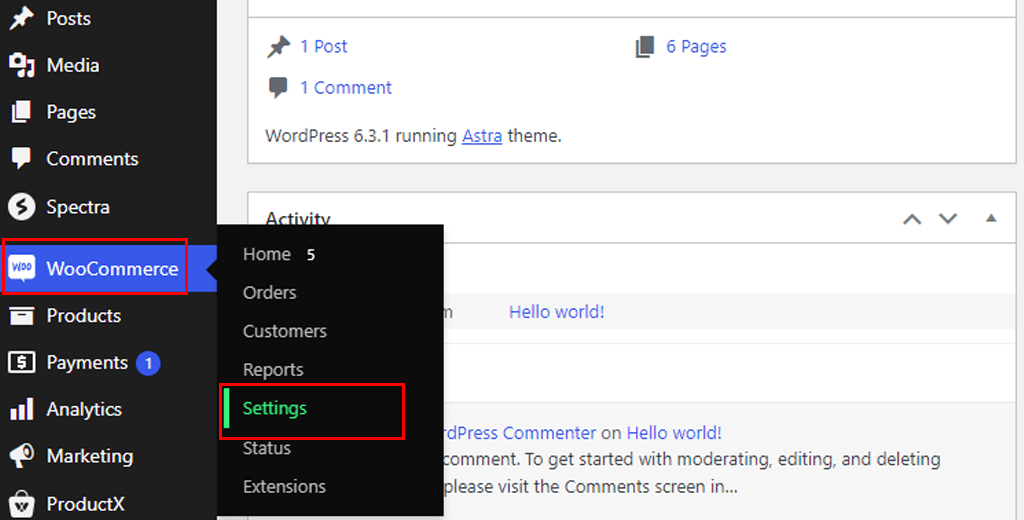
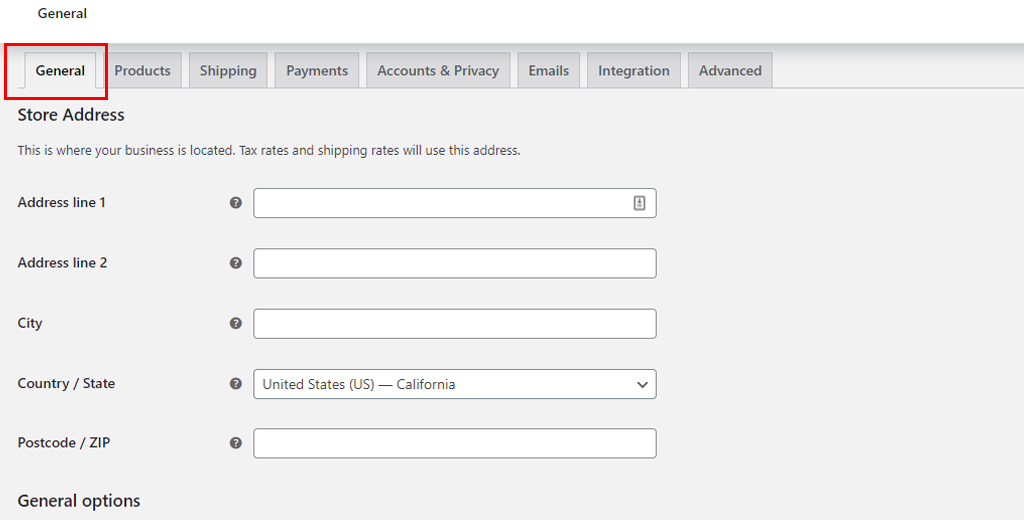
There look for the general setting, this is where your business is located. Also, tax rates and shipping rates will use this address.
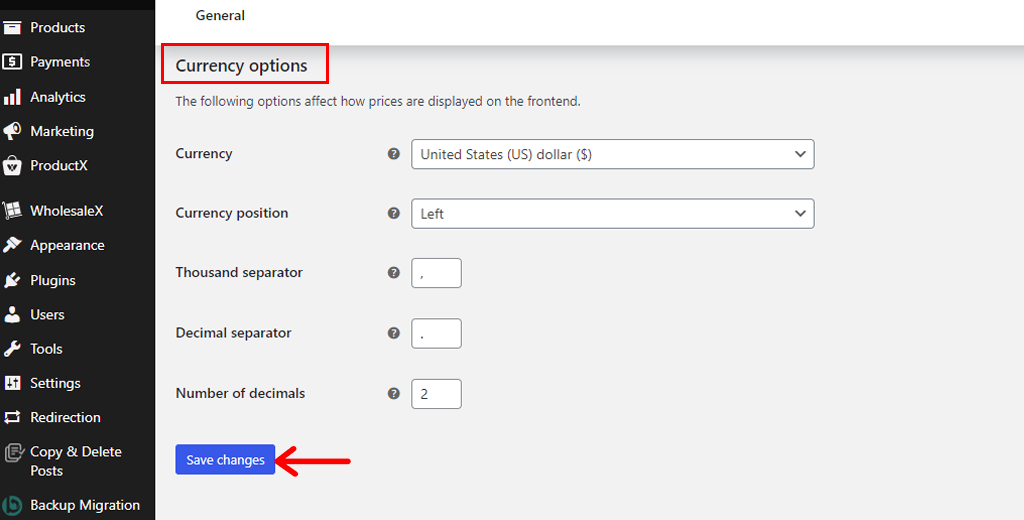
When you scroll more, you’ll have the option to set currency. These options affect how prices are displayed on the front end. And click save changes.
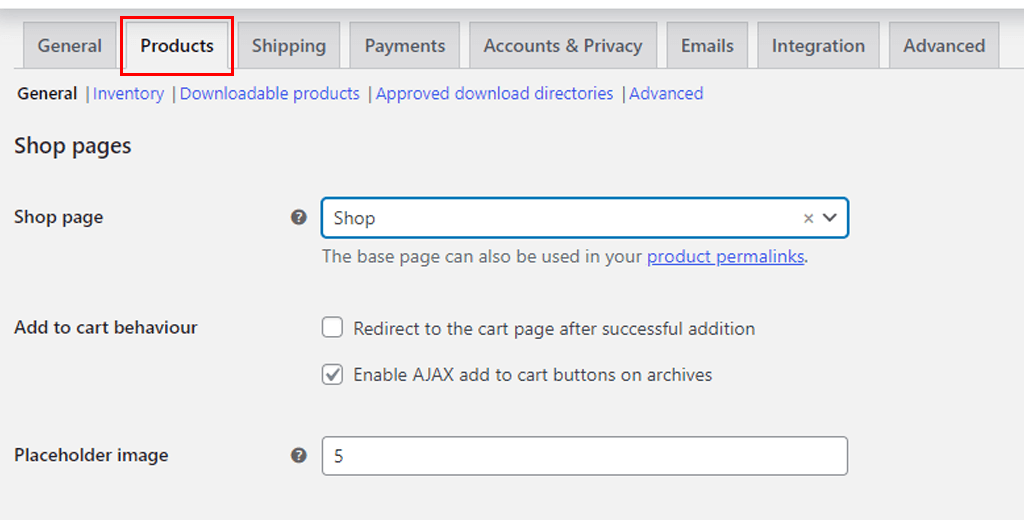
Moving onto the “Product” tab, you get to choose the shop page. You can also use base pase in your product permalinks. Plus choose your “Add to cart behavior,” either to redirect the cart page or enable the AJAX cart button.
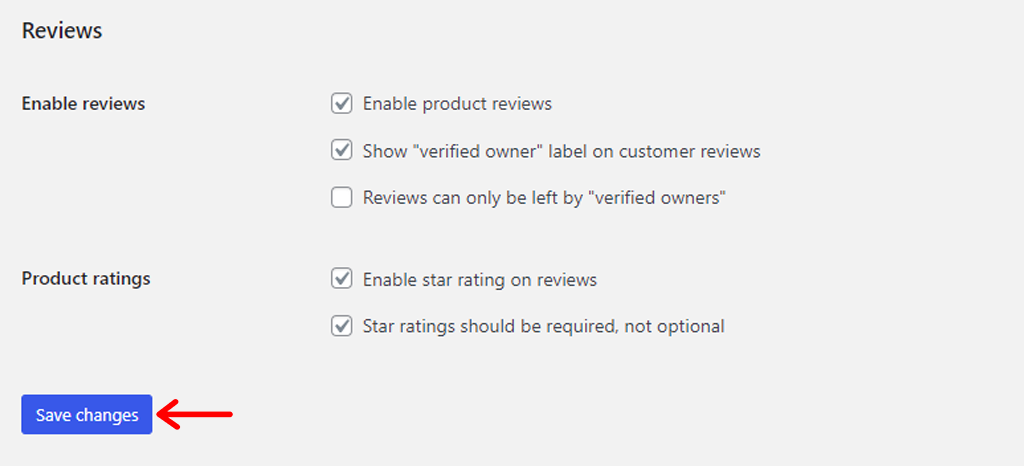
You can also enable product reviews and product ratings. Once done click the “Save Changes” option.
Further to add products, go to “WooCommerce > Home.” There you can choose what product you want to add.
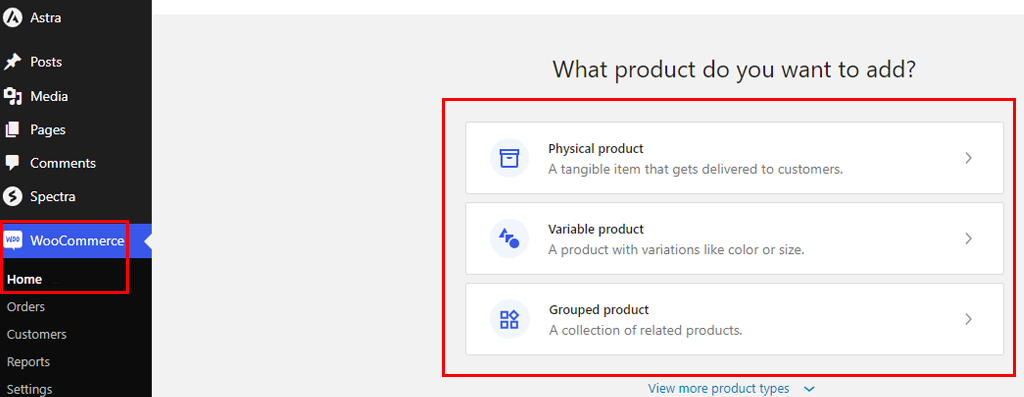
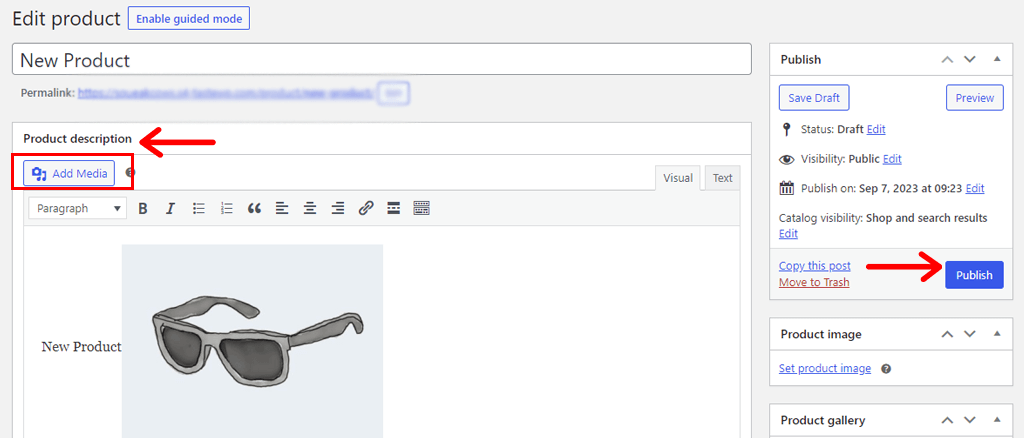
Now on the product editor page, start by adding the product name, description, and image. Once you’re done click the “Publish” button.
So, you’ve successfully added a product to your WooCommerce wholesale store.
Now, let’s look into installing the WholesaleX plugin in the next section.
Install Free version of WholesaleX
Getting the free WholesaleX plugin up and running is a breeze, just like adding any other tool to your WordPress site. Here’s the fun part:
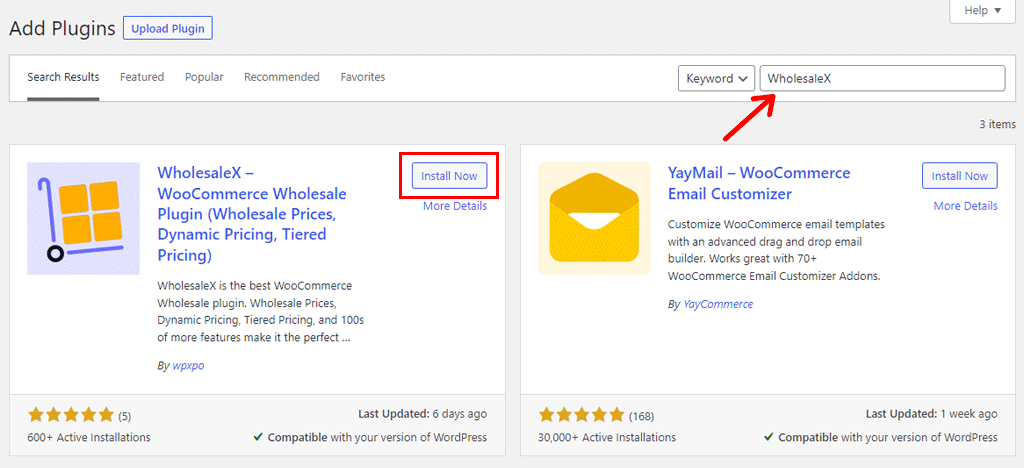
Start by logging into your WordPress dashboard, then head over to the “Plugins” section and click on “Add New.”

To find the WholesaleX plugin, simply type it into the search bar. Then, click the “Install Now” button.
Once installed, to get it running, simply click the “Activate” button when it pops up. Get ready to unlock its power!
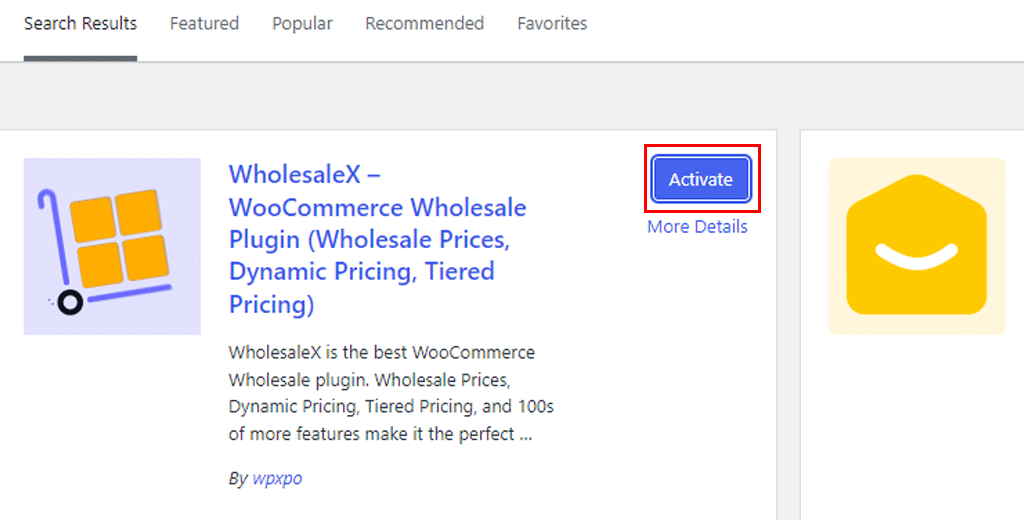
Well done! You’ve now got WholesaleX up and running on your website, all set and ready to go.
Going Through the WholesaleX Plugin Setup
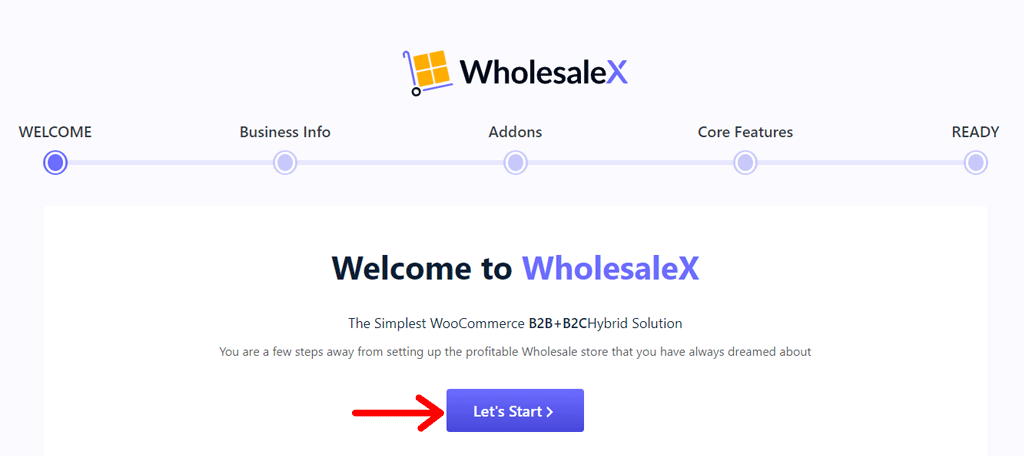
Once you’ve installed the plugin, it’ll redirect you to the setup page with a welcome message. There, click on the “Let’s Start” button.
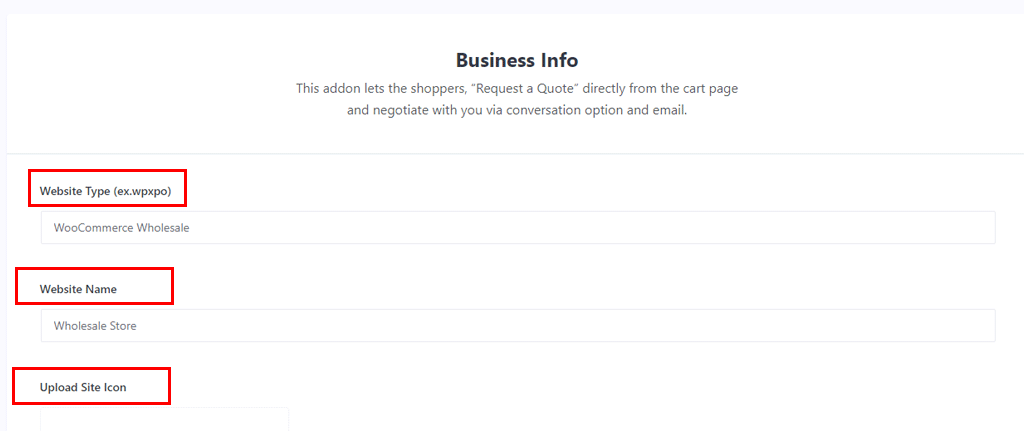
Now start by adding your business information, including website type, website name, logos, etc.
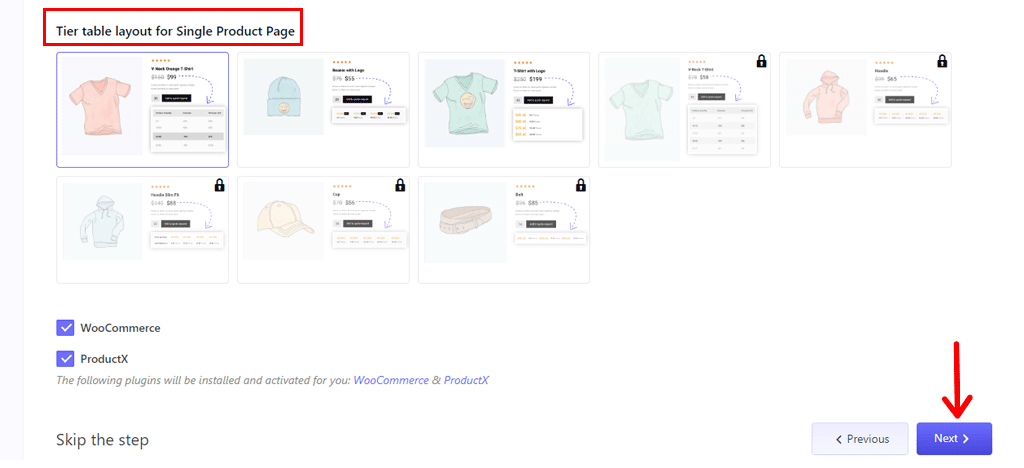
Further scrolling down, you can choose a tier table layout for a single product page. So, choose your layout and click on the “Next” button.
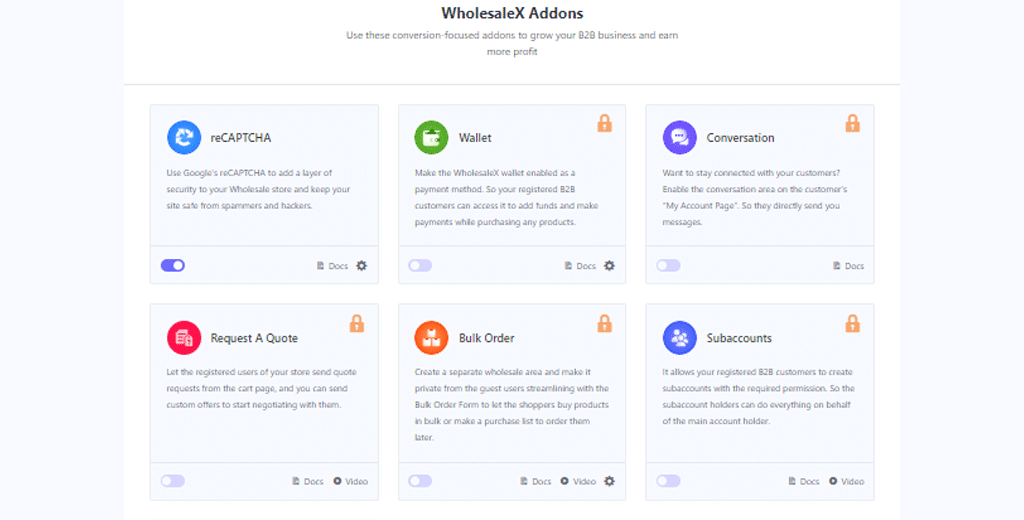
Moving on you’ll get the list of WholesaleX addons. There you can choose to enable the one as per your need. Then click on the “Next” button.
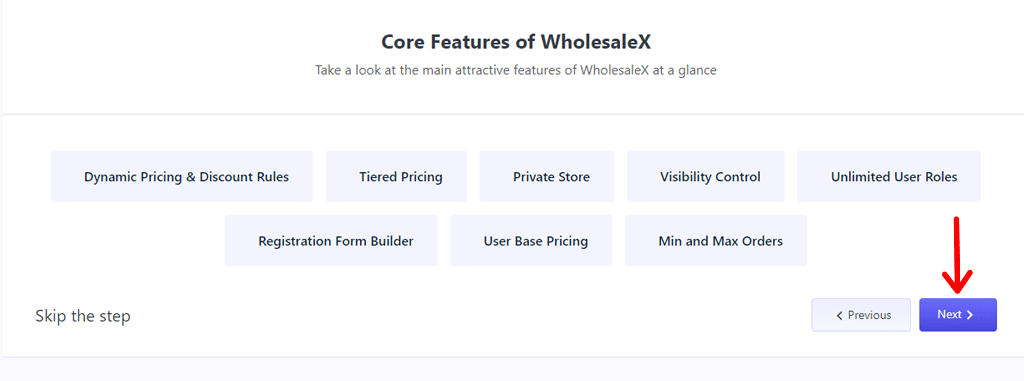
Further, on the next page, you can take a look at the main attractive features of WholesaleX at a glance. Then click “Next.”
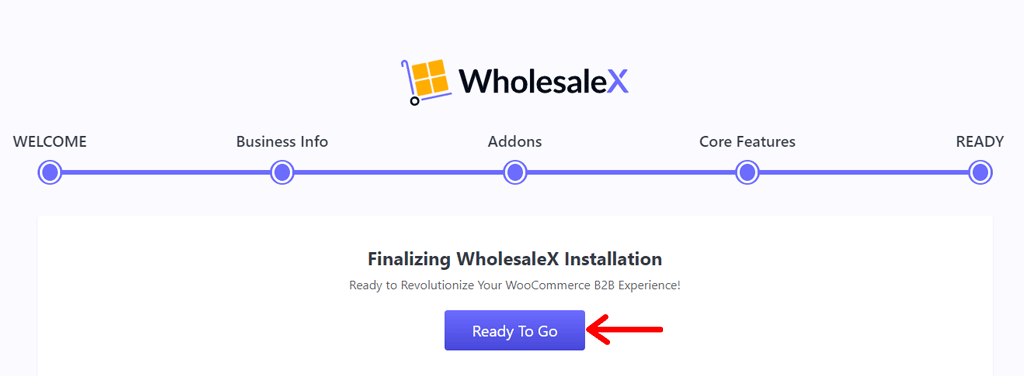
Finally, with everything done, click on the “Ready to Go” button. And you’re all set to go with the free version of WhosesaleX plugin.
Purchasing and Installing Premium Version WholesaleX
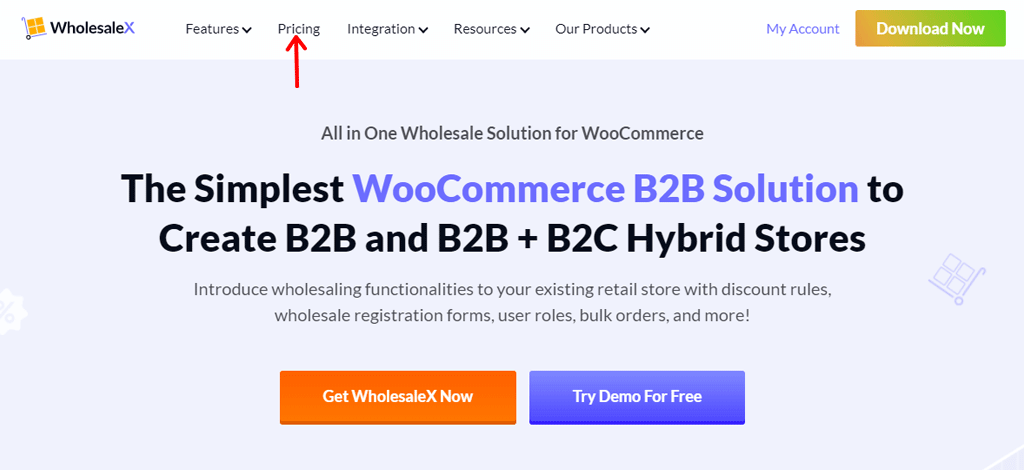
To unlock the premium plan, head over to the official WholesaleX website. Start by clicking the “Pricing” in the menu at the top.
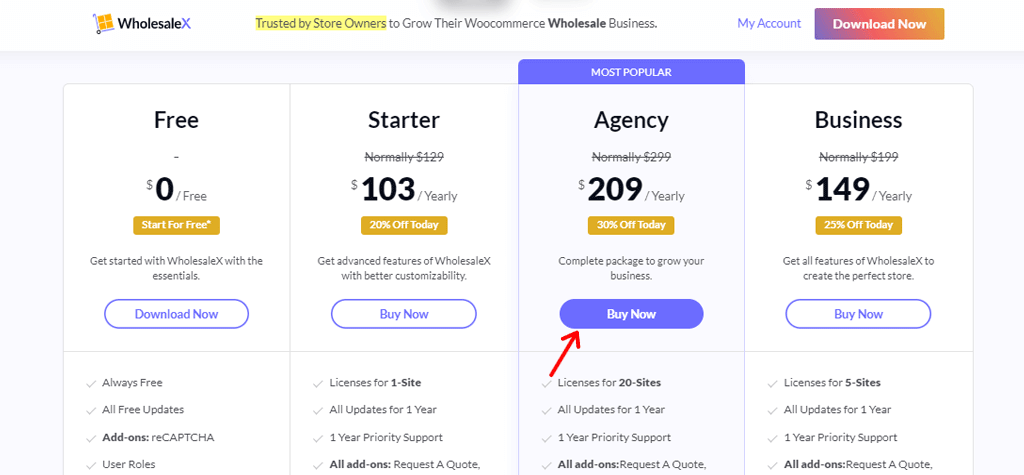
Once on the Pricing page, you’ll spot three pricing choices. Select the one that suits your website needs, and hit the “Buy Now” button. It’s that easy!
After you’ve made your selection, it’s time to head to the checkout page. If you’ve got a promo code, then this is where you can enter it to snag a deal.
Then, just share your basic info like your email and name to wrap things up.
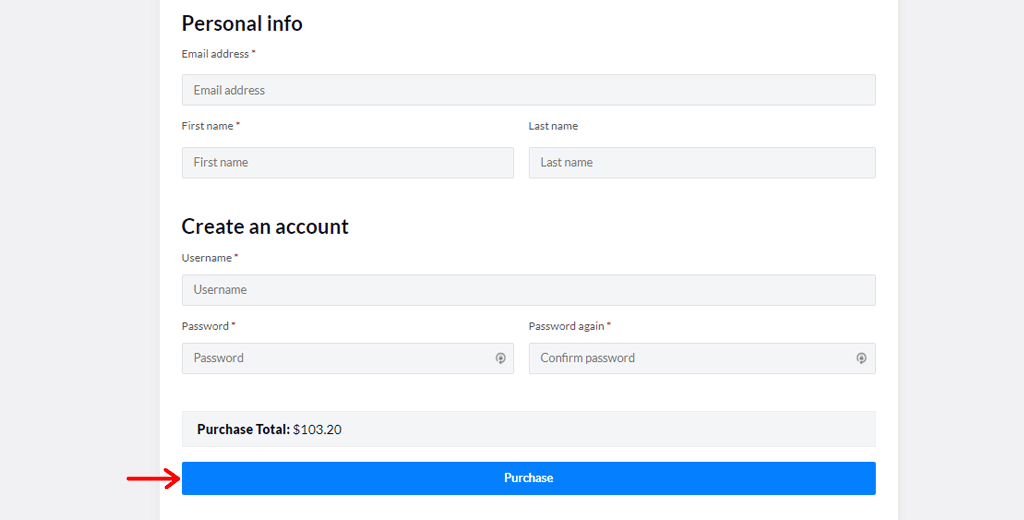
Once you’ve completed the purchase, check your email. You’ll receive an email containing your account info, payment details, and a download link for the premium plugin. Along with instructions on what to do next.
Now, go ahead and download the plugin.
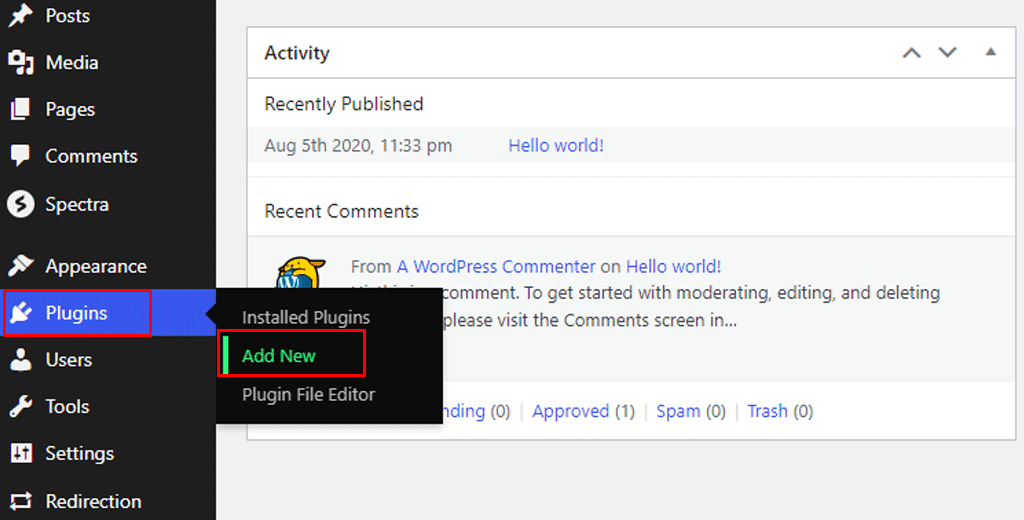
Don’t forget to save the activation key that comes with it. Once that’s done, go to your WordPress dashboard. Find the “Plugins” tab and click on “Add New.”
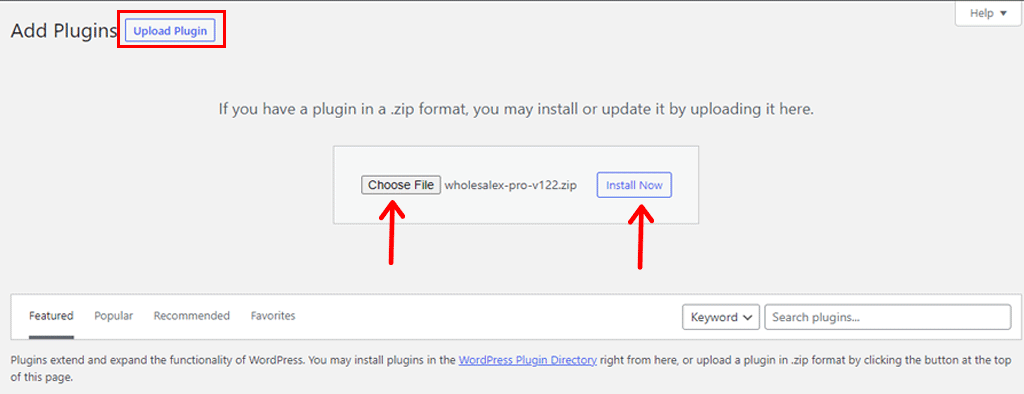
Then, hit the “Upload Plugin” button to continue. And, click the “Choose File” button and upload the ZIP file you just downloaded. Then, hit “Install Now” right beside it.
Once that’s done, don’t forget to give it some power by clicking the “Activate” button.
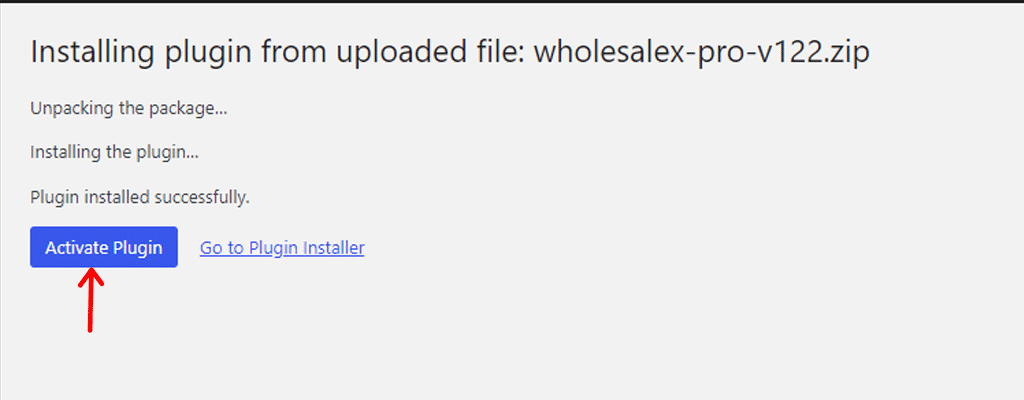
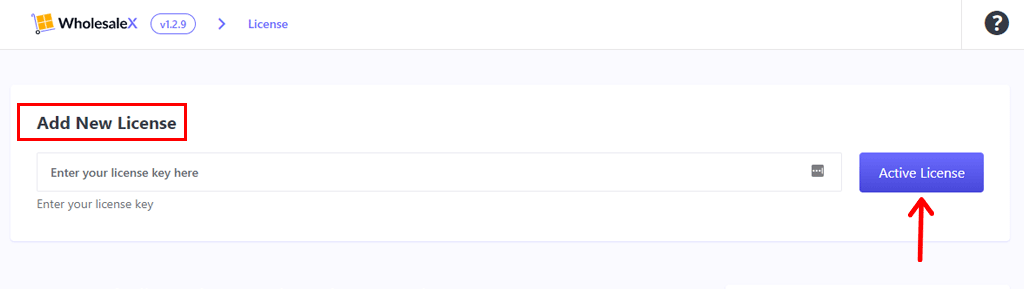
Then you’ll be asked to fill in the license key. So, fill in your license key from the email.
Finally, give that “Activate License” button a click, and you’re good to go! It’s that easy.
Once you’ve completed this process, your website is all set to use the premium WholesaleX plugin.
Creating a WooCommerce Wholesale Store with WholesaleX
I. Creating Wholesale User Roles
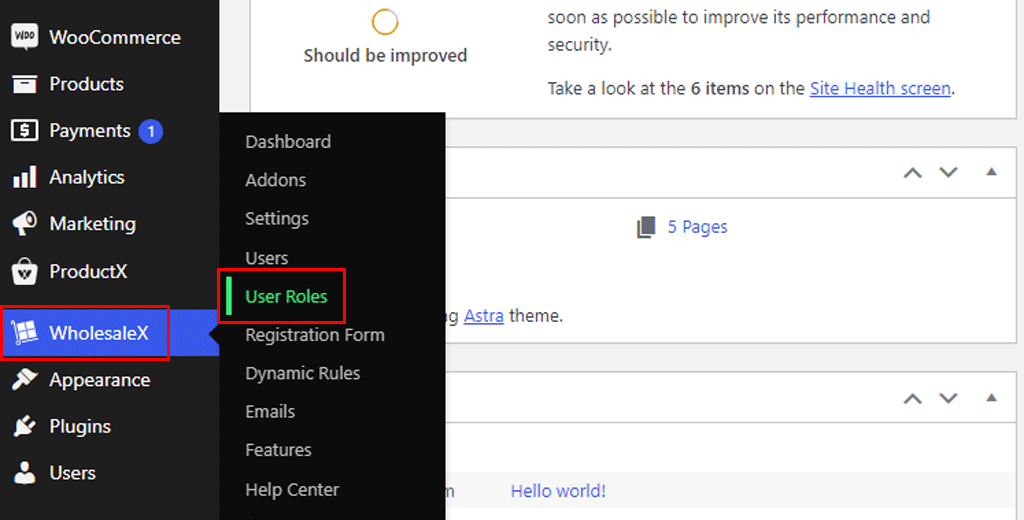
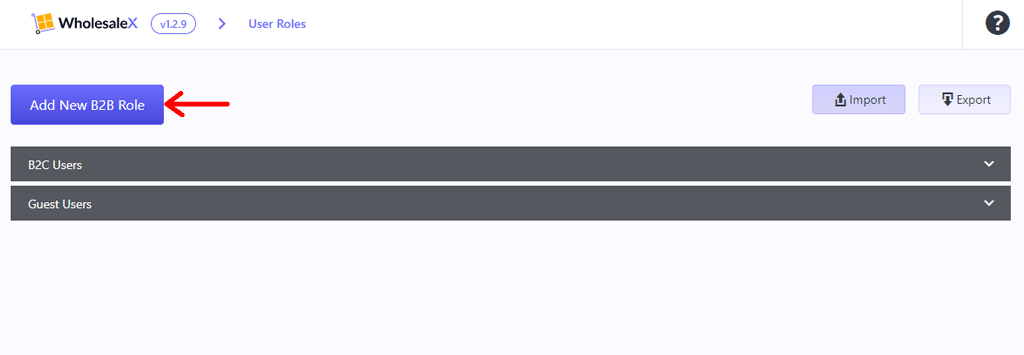
To kick things off, head over to the “WholesaleX > User Roles” option. It’s your gateway to getting started.
There, you can create a B2B user role. Just click the “Add B2B User” button.
Then fill in details like the name, role ID, whether prices should be shown, preferred payment and shipping methods. Also, you can decide to either include or exclude tax. Once you’re done, hit the “Save” button.
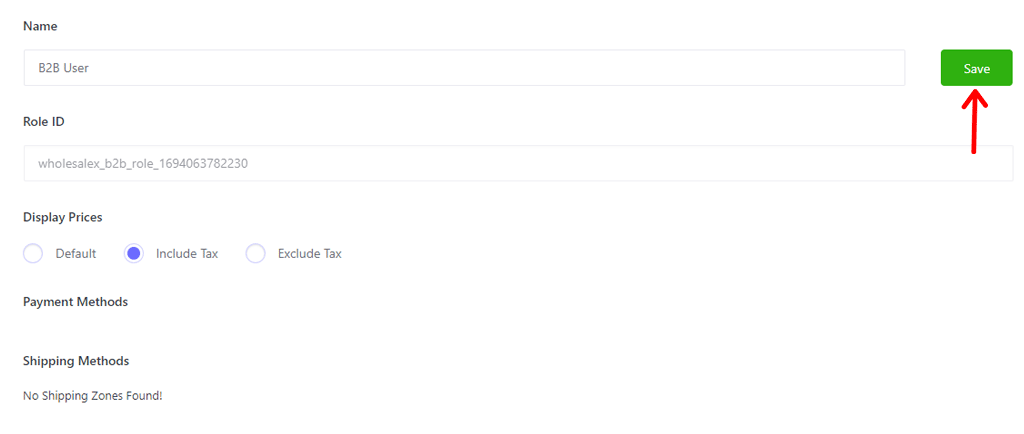
Now your B2B user role is ready.
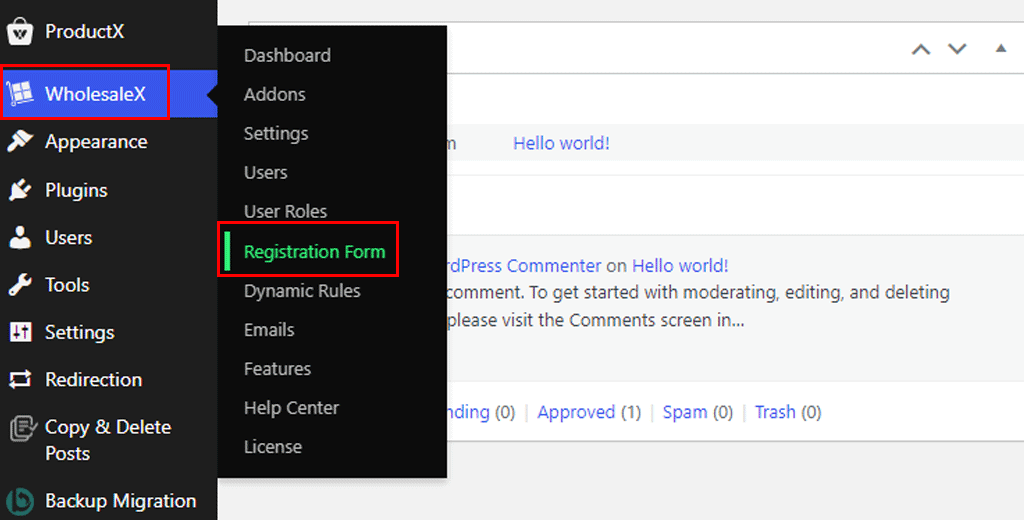
II. Customize Registration Form
Likewise, to customize the registration form, just find the “WholesaleX” menu and click on “Registration Form” within it.
This is where you’ll begin building your new registration form. Now, look for the “Add New” option and click on it. There you can choose what fields to add to your form.
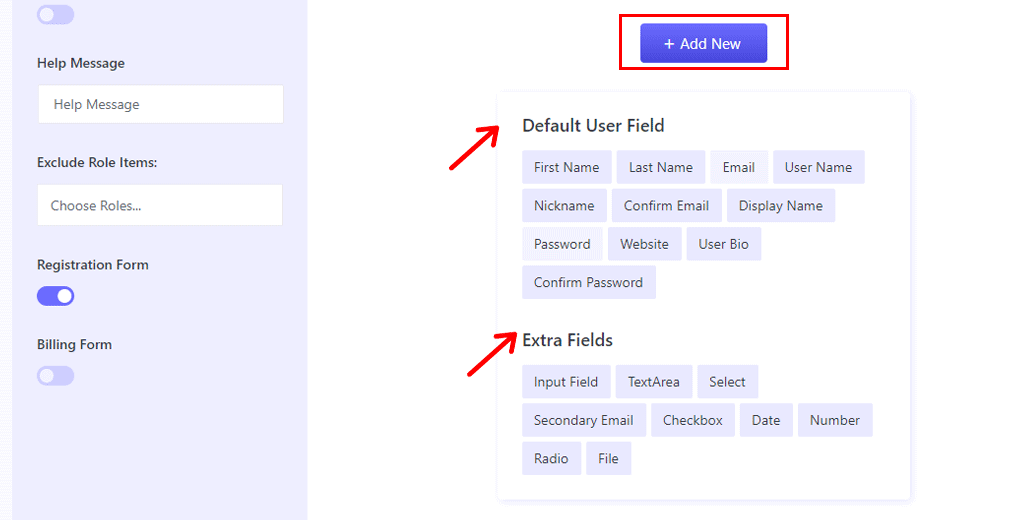
Now, let’s talk about the “Default User Field.” This part allows you to choose what basic information you want to collect from users during the registration process.
You can include fields like first name, last name, email, username, password, website, user bio, and more.
To make your registration form more tailored to your specific needs, you can go further by adding “Extra Fields.” These are additional pieces of information that you might want to gather.
They can be in various formats, like a text area, checkboxes, date pickers, or even file upload fields.
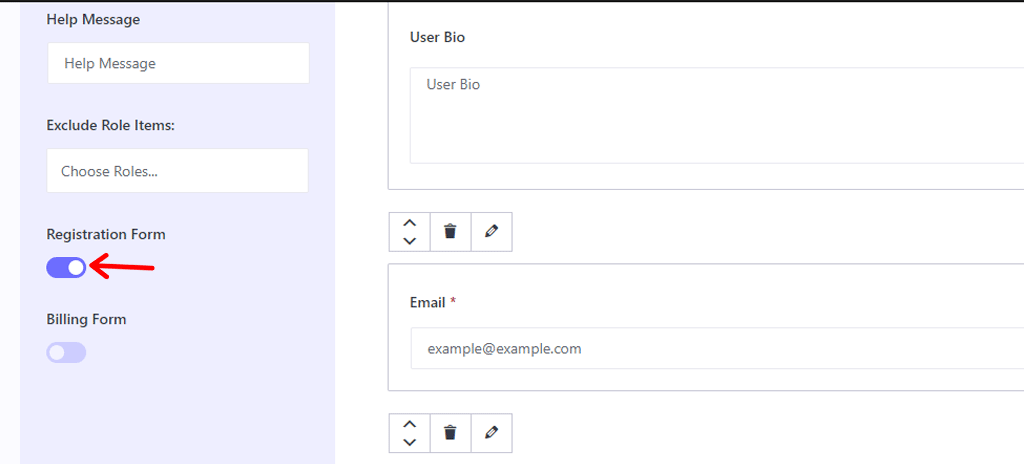
Make sure to enable the “Registration Form” button on the left side.
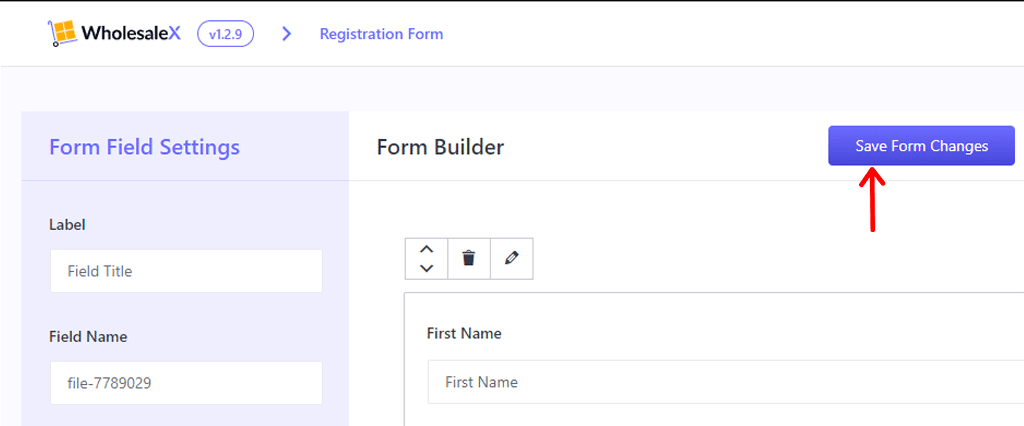
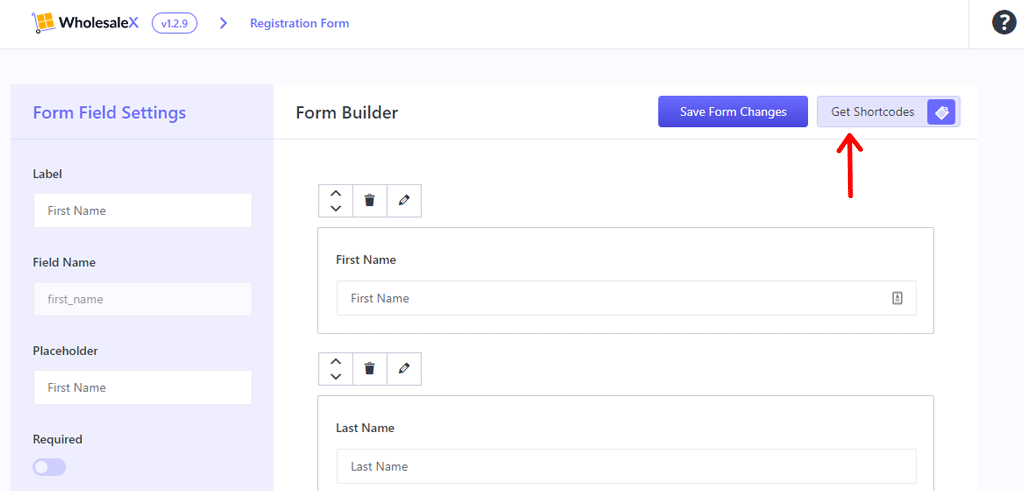
Once you add fields, click the “Save Form Changes” button.
Now you’ll get the shortcodes, so you can insert it anywhere throughout your website. Simply click on the “Get Shortcode” option.
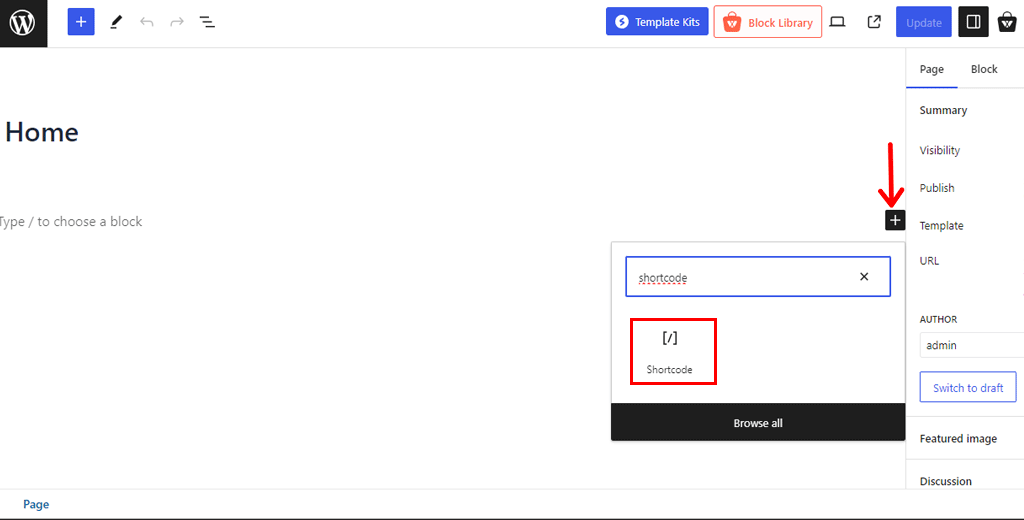
After that you’ll have a list of shortcodes, simply copy the one. Now go to pages and choose the one that you’ll insert the registration form in.
For this tutorial, we’ve chosen the “Home” page.
Now click on the “+” icon and search for the “Shortcode” block. And add it to your page.
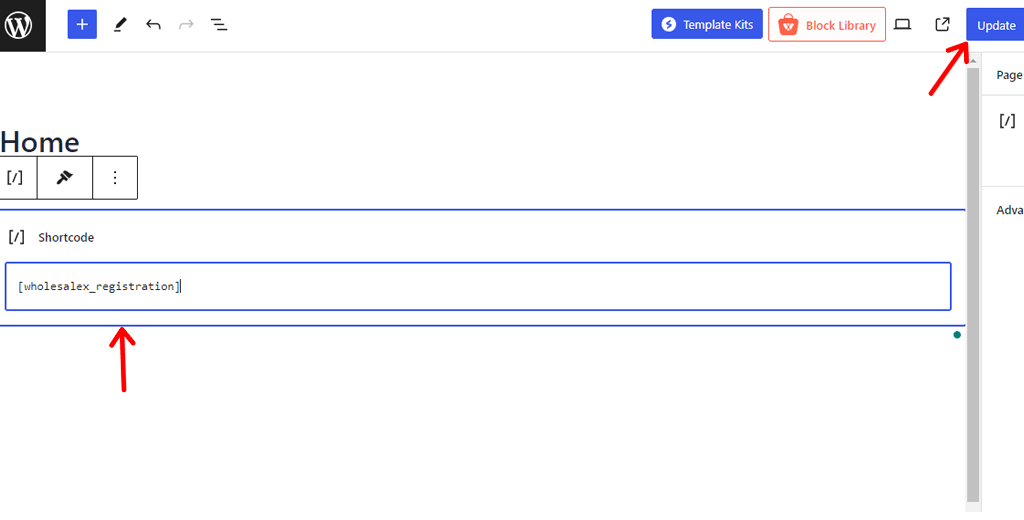
Then, paste the registration form shortcode that you copied earlier. And click the “Update” button.
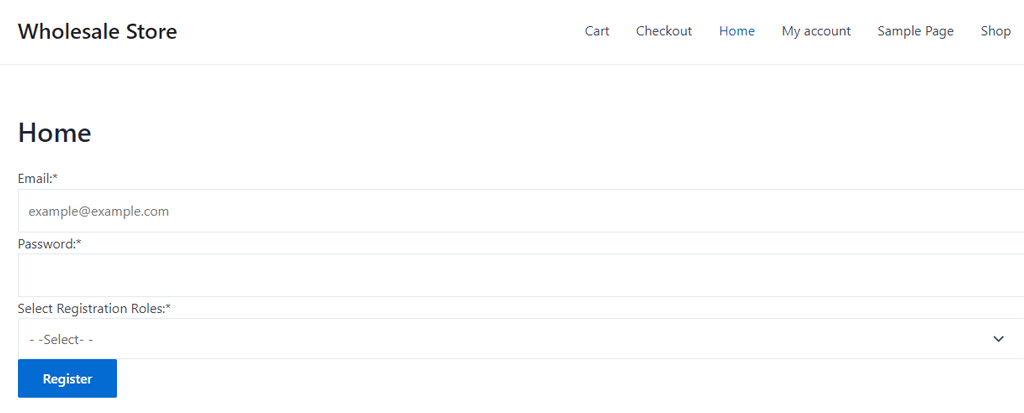
Below is an example of your registration form.
III. Setting Prices and Discounts
Similarly, to set the prices and discounts, go to the “WholesaleX” menu and click on “Settings.”
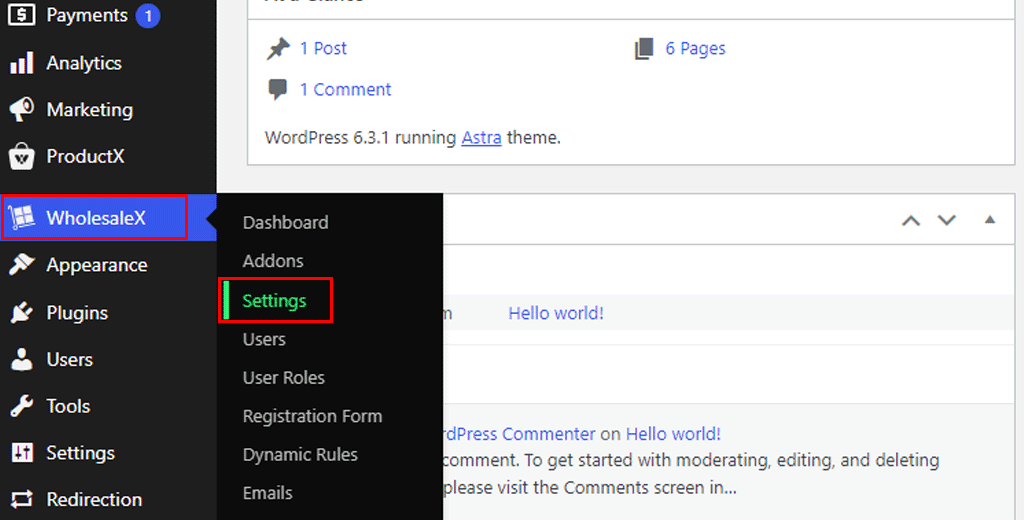
After that, go to the “Price” section. From there, you can set up different price levels, and change the order in which prices and discounts are shown.
Also, choose whether to display prices in the store with or without taxes, and do more related things. Once you’re done, click on the “Save Changes” option.
IV. Control Product Visibility
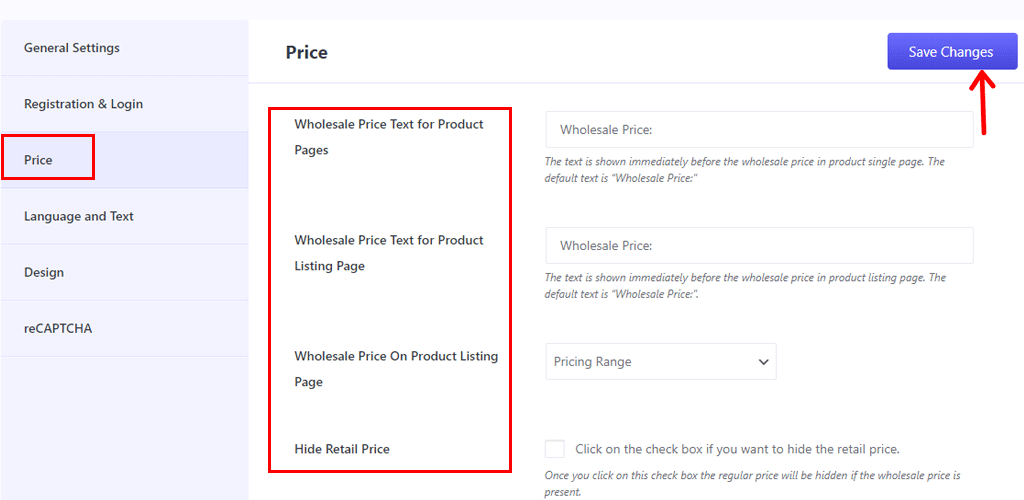
Furthermore, to set up how your product is shown to people, start by going to “WholesaleX > Settings.”
Now, just head to the “Design” section, and from there, you can adjust how the product table looks on the single product page.
Further scrolling down, you can change the colors for buttons, when you hover over them, the text, and more. Also, choose whether or not to display pricing above the add-to-cart button.
Once you’re done, hit that “Save Changes” button.
V. Setting Wholesale Dynamic Rules
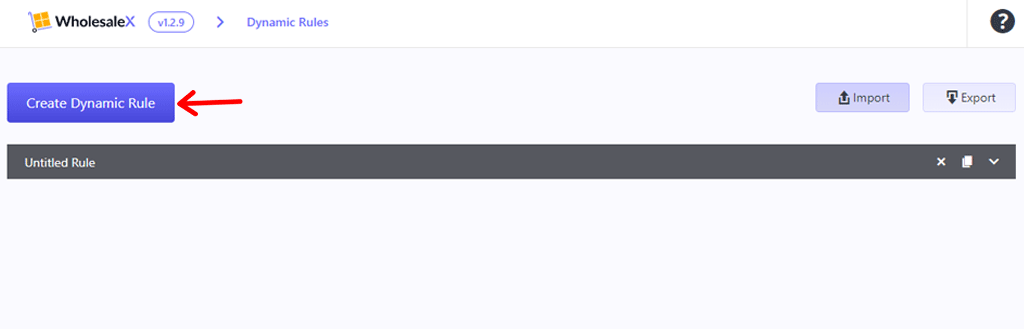
To create a dynamic rule in the “WholesaleX > Dynamic Rules” menu.
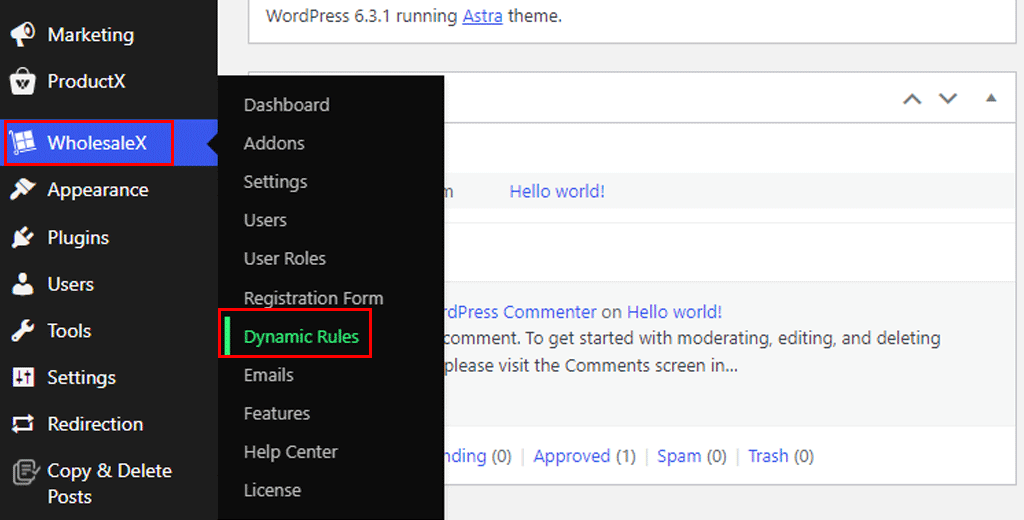
After that, just click on “Create Dynamic Rule.”
First, you need to name the rule and enable the rule stat to make it live. Then, select rule type like and choose who can use this rule.
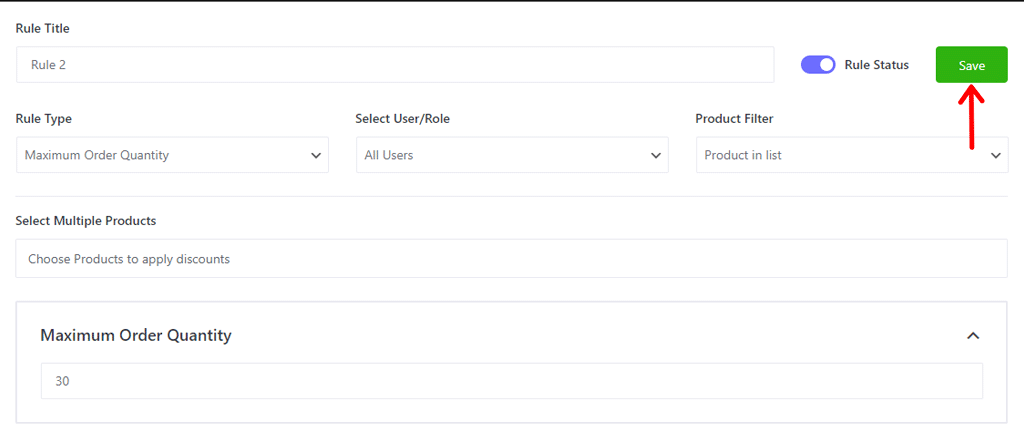
You can also set the maximum order quantity as per your liking. Finally, save it by clicking the “Save” button.
VI. Configuring Emails
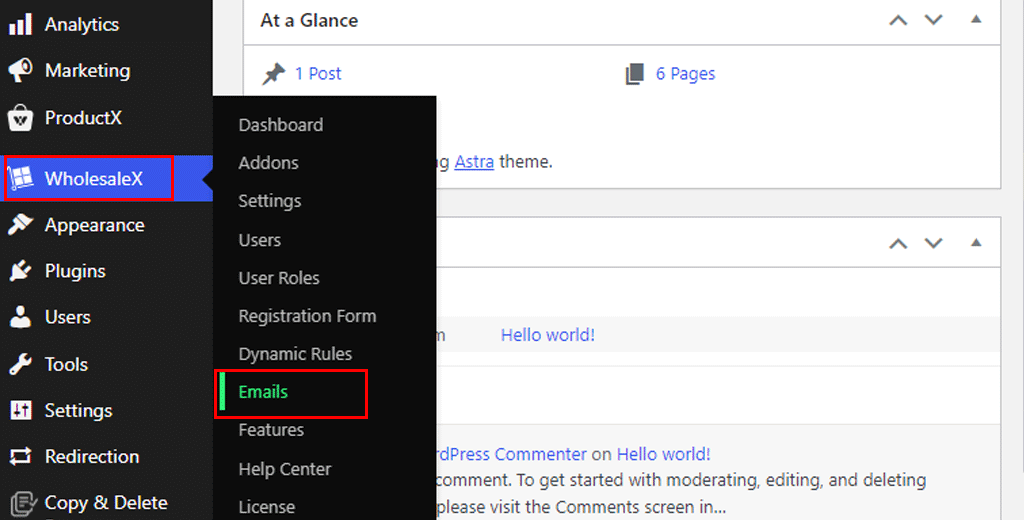
Our final step in creating a WooCommerce wholesale store is configuring emails.
To get started go to the “WholesaleX > Email” option.
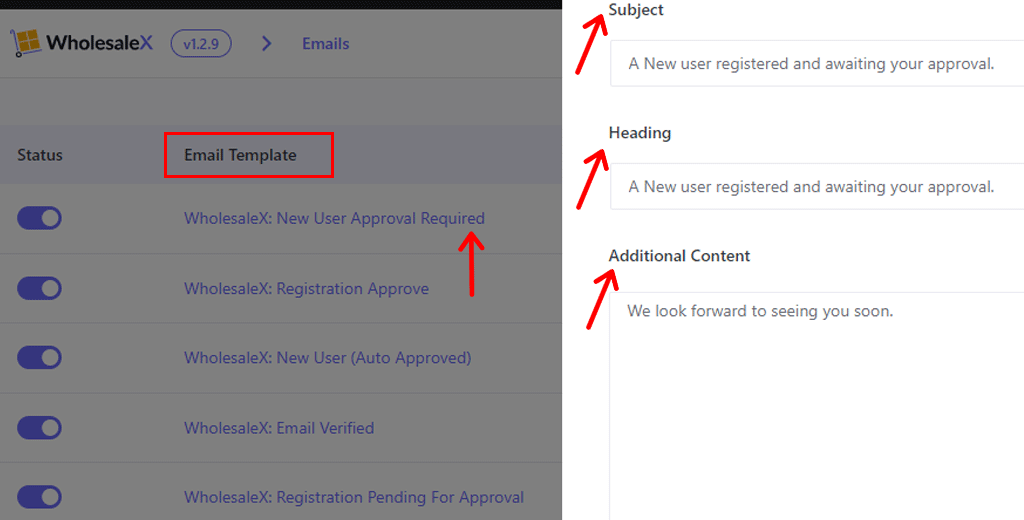
There you’ll see tons of email templates that you can choose to turn on or off. You can also override the email template.
So, choose a template, Here we’ll choose a new user approval template. Now you can change the subject, heading, and email content.
And you’re all set with your new WooCommerce wholesale store.
So, this ends our complete guide on creating a WooCommerce wholesale store using the WholesaleX plugin.
FAQs on Creating a WooCommerce Wholesale Store
1. How do I set up wholesale in WooCommerce?
You can always use WooCommerce wholesale plugins. They allow you to create and set wholesale user roles, set wholesale pricing, and restrict access to wholesale products.
2. How do I set up best-selling products in WooCommerce?
Setting up best-selling products involves tracking your sales data and identifying products with high demand. Utilize plugins like WooCommerce features to display these products on your website. Also, analyze your sales reports to determine your top-performing items.
3. What are the best practices for setting up shipping and handling for wholesale orders?
When it comes to shipping and handling wholesale orders, it’s essential to define clear shipping policies and rates. WooCommerce allows you to set up shipping zones, methods, and classes. Consider using plugins like Table Rate Shipping for more advanced options.
4. How do I monitor the performance of my wholesale store?
It requires regular analysis of sales data, customer feedback, and website traffic. Use additional tools like Google Analytics to help you gain insights into user engagement and website performance.
5. What features does WholesaleX offer for managing orders?
WholesaleX offers advanced pricing options, bulk order forms, minimum order requirements, and tiered pricing based on customer roles. Additionally, it allows you to set up custom catalogs and restrict access to specific products for wholesale customers.
Conclusion
And that’s a wrap, folks! We’ve come to the end of our article on how to create a WooCommerce wholesale store.
Hopefully, we believe that you can understand all that we discussed in this creating WooCommerce wholesale store. With the help of the WholesaleX plugin, you can precisely craft a WooCommerce wholesale store in no time.
Even so, if there’s anything we missed or unclear in this Woocommerce wholesale store tutorial, then please let us know in the comments section.
Also, do check out our other related articles. Such as ProductX review and the ultimate checklist to create multi-language WooCommerce site.
Lastly, do follow us on our social media handles Facebook and Twitter to keep up with us.